

Email lists are the start of any email campaign and newsletter management. However, a list can get messy from multiple merges or with user spammy behavior.
The benefits of cleaning your email list are:
- Improve deliverability - Every email provider uses your sender score to determine where to route your emails. To avoid being labeled as SPAM and successfully reach your user, the first step is to avoid sending emails to non-existing addresses. A bad sender score is hard to revert, so better to spend some time up-front and clean your list from unreachable email addresses.
- Save money - Usually, you pay for each email you send. First, pruning your email list to remove duplicates and invalid addresses will save you money. Then, you need to remove all disposable email addresses that will never be read to keep only real emails.
- Detect and fix typos - After the cleaning process, wrong email addresses will be flagged. Manually, you can find simple typos in names or domains and fix them.
Email list cleaning is an important part of any digital business and must be done regularly. Datablist is a perfect data tool for performing this cleaning process. Using this step-by-step guide, you will learn:
- How to remove duplicate emails
- How to verify email address syntax
- How to check if emails are from disposable providers
- How to know if emails are business emails
- How to ensure email domains exist
- How to know email providers
- How to remove email aliases
Datablist can be used without registration to view and edit CSV files. However, the email verification service that we'll use later requires an account.
👉 Create your account for free 👈.
How does it compare to paid email cleaning services?
If you search for email verification services on Google, you'll find hundreds (thousands?) of them. Almost all of them charge a fee per email address. Datablist includes an email verification service and it is free. It is great and enough for simple email verifications. However, if you need deeper analysis or if you have to perform verifications on hundreds of thousands of emails, please use a paid email cleaning service.
Step 1: Import email addresses
Create a collection
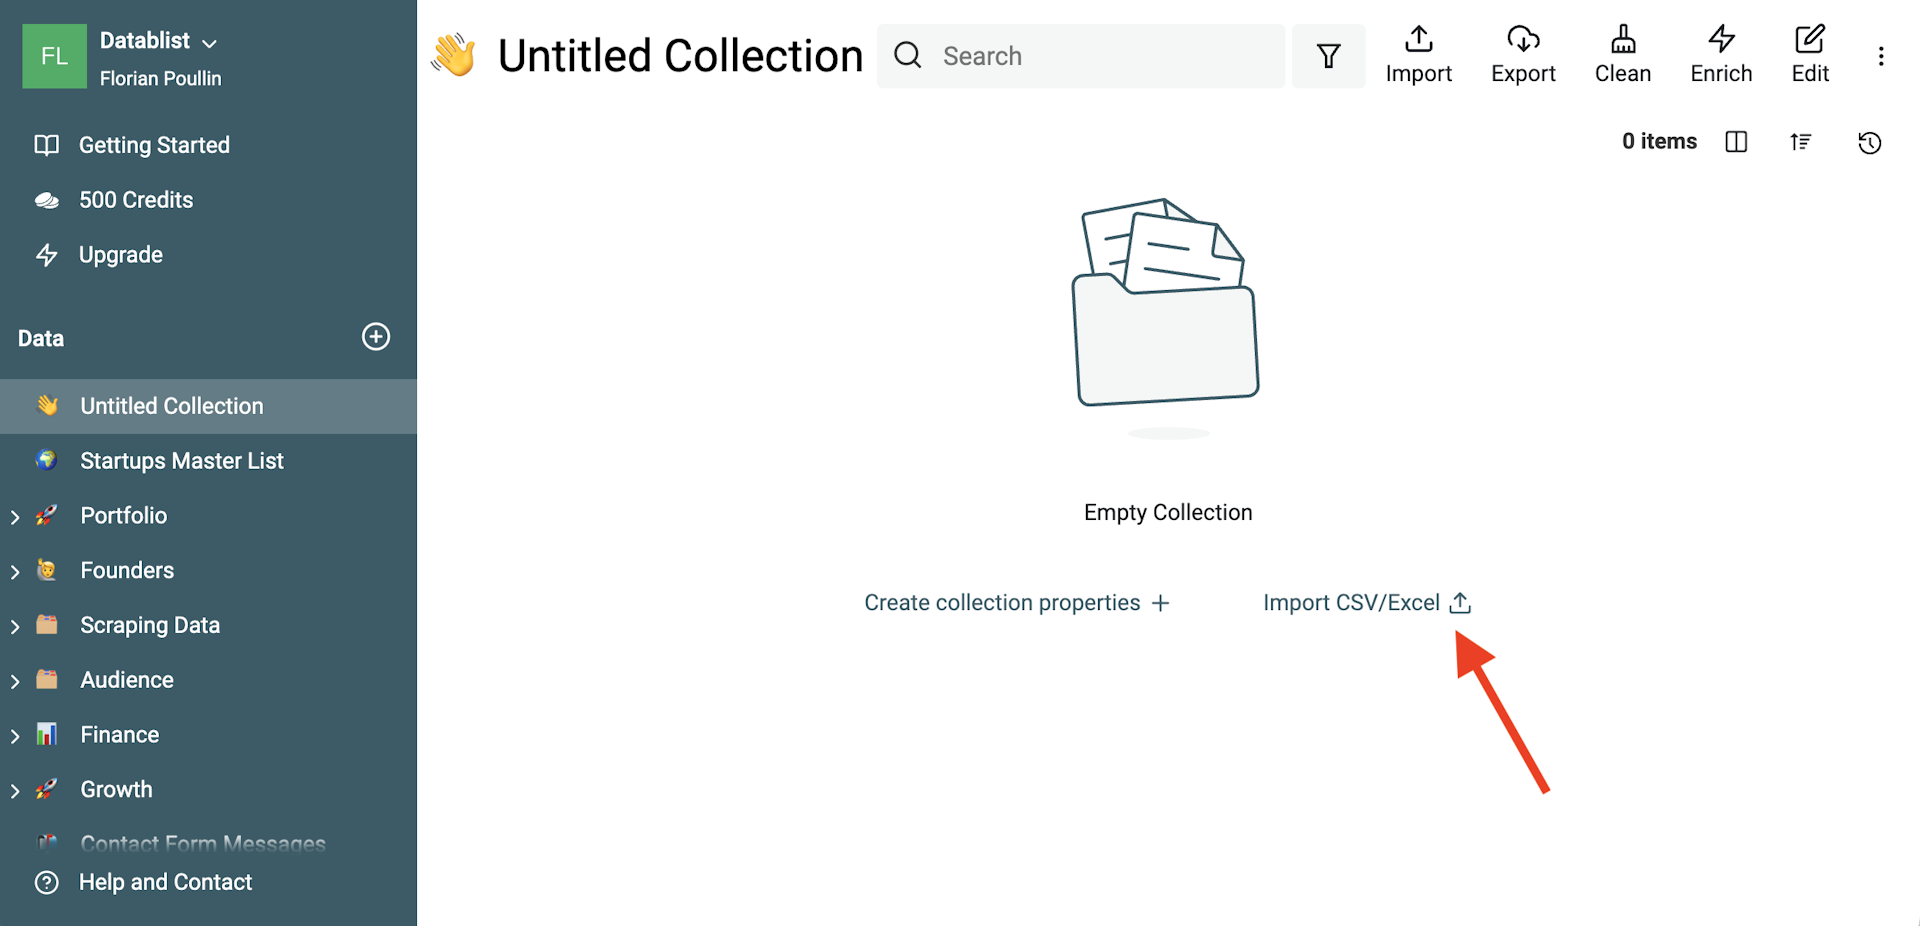
The first step in the email cleaning process is to create a collection on Datablist in which you will pour your email addresses.
In Datablist, click the + to create a new collection. Give it a name (and an icon 😍).
Import your lists of email addresses
Now you have a collection, it's time to import your email lists: whether you have only one email list or several that you want to merge!
Datablist offers two options to import your data:
- With CSV files
- Using copy/pasting from a spreadsheet
Option 1: Import from CSV files
The CSV format is a simple standard to transfer tabular data between software applications. Every newsletter tool and digital marketing solution offers exports of your contacts in CSV files. CSV files are first-class citizens in Datablist.
See also our How to join CSV files by a unique identifier and How to remove CSV duplicates guides.
In this example, we will use a demo contact CSV file with three columns: First Name, Last Name, Email. Download the demo file here.
To import your CSV file, click the "Import CSV" button and select your file.
Datablist reads CSV files and Excel files. Your first rows will be read to detect the encoding used. If you see weird characters on the detected headers or later when importing, create another collection and try to import your CSV using another encoding.
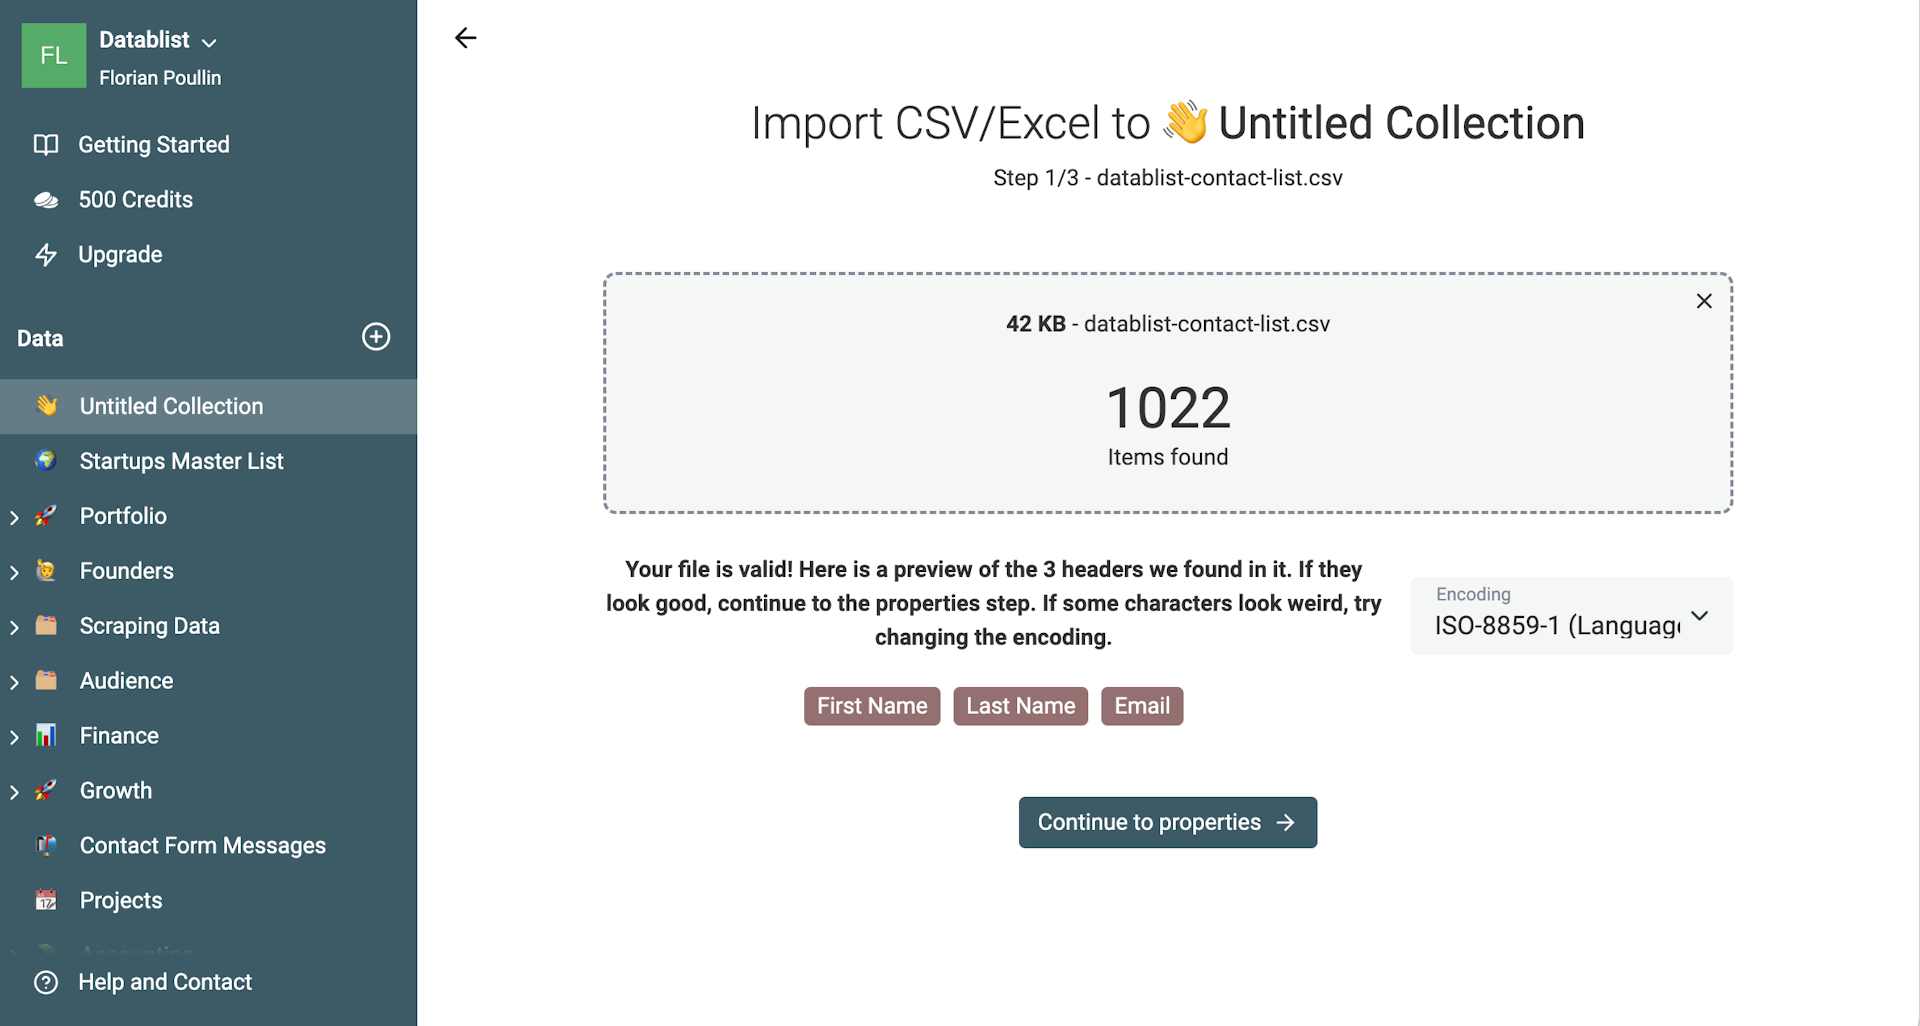
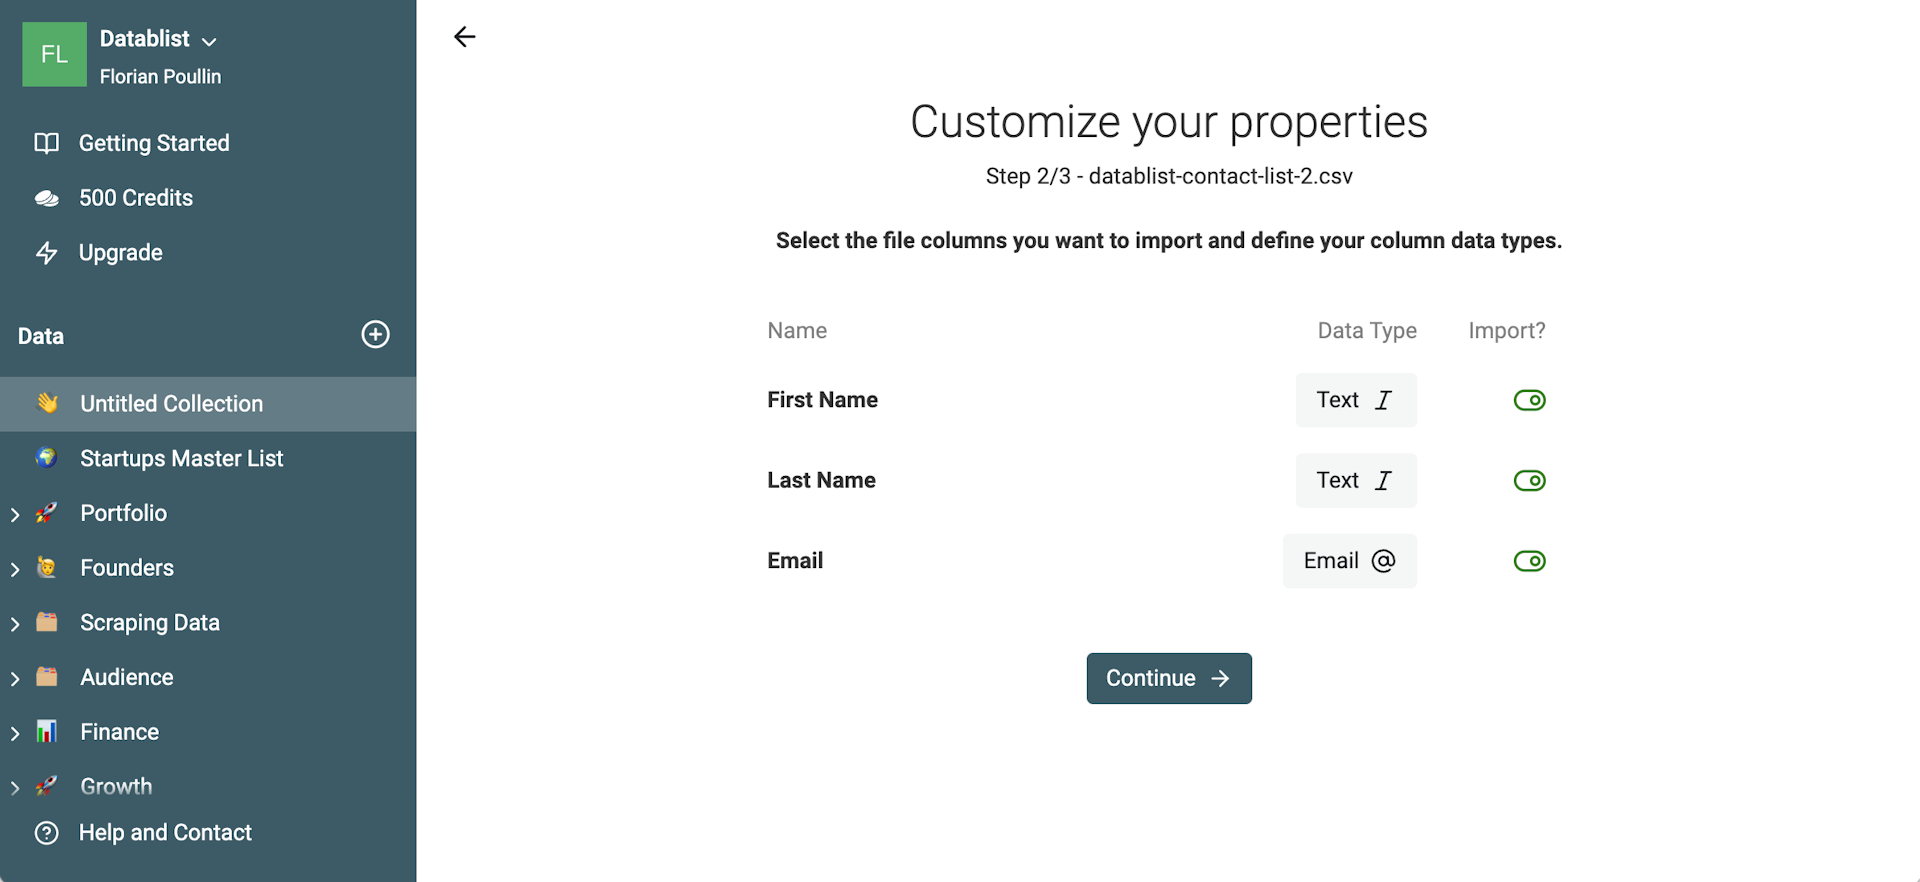
Datablist will read the columns and it will show you a mapping page. If your email addresses are valid, the data type will be Email. It will add some validation to your data edition later on Datablist.
Here is a video of the full process:
Option 2: Import with Copy/Pasting
Datablist is compatible with copy/pasting from any spreadsheet. Just select the cells from your spreadsheet, go to your Datablist collection, and use the Edit -> Paste from your browser or directly the Ctrl + v keyboard shortcut.
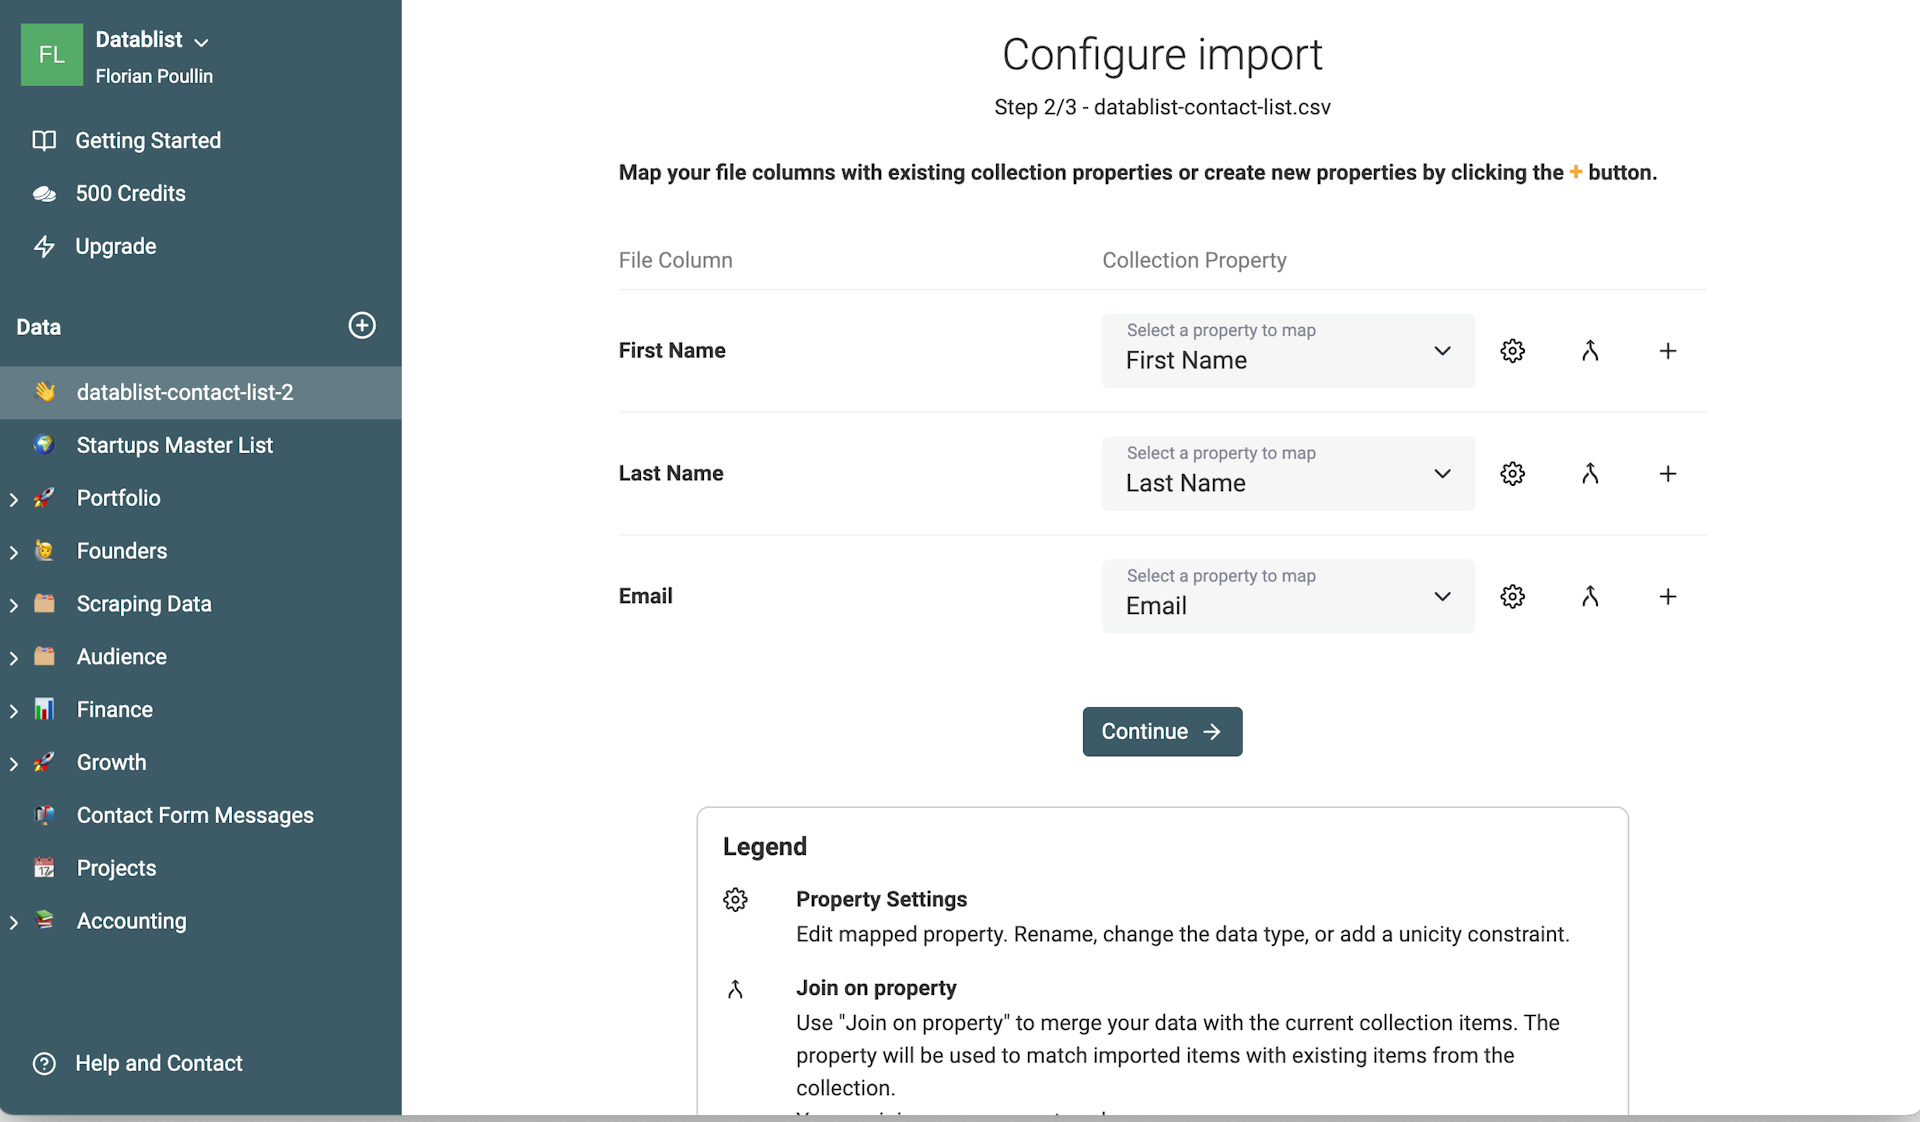
On pasting, Datablist will show you the columns and rows it has detected. To import a column, map it to an existing property or create a new property.
Warning: Only mapped columns will be imported!
Import other contact lists if needed
If you are building an email collection from several sources, just import all your lists into the same collection.
When importing another file, a mapping step will be shown. In this step, you will map your collection properties with your CSV columns. With this mapping, your new data will be added to the existing properties.
Step 2: Find and merge duplicates
It's common to have an email list built over time. The result is several email listings merged into one. Resulting in duplicates! If your list stores contact information like First Name, Last Name, etc. you might have contact information spread over several duplicate rows.
With all your email addresses in one place. The second step is to remove or merge duplicate entries.
Use Datablist "Duplicates Finder" features by clicking on the "Duplicates Finder" button in the clean menu.
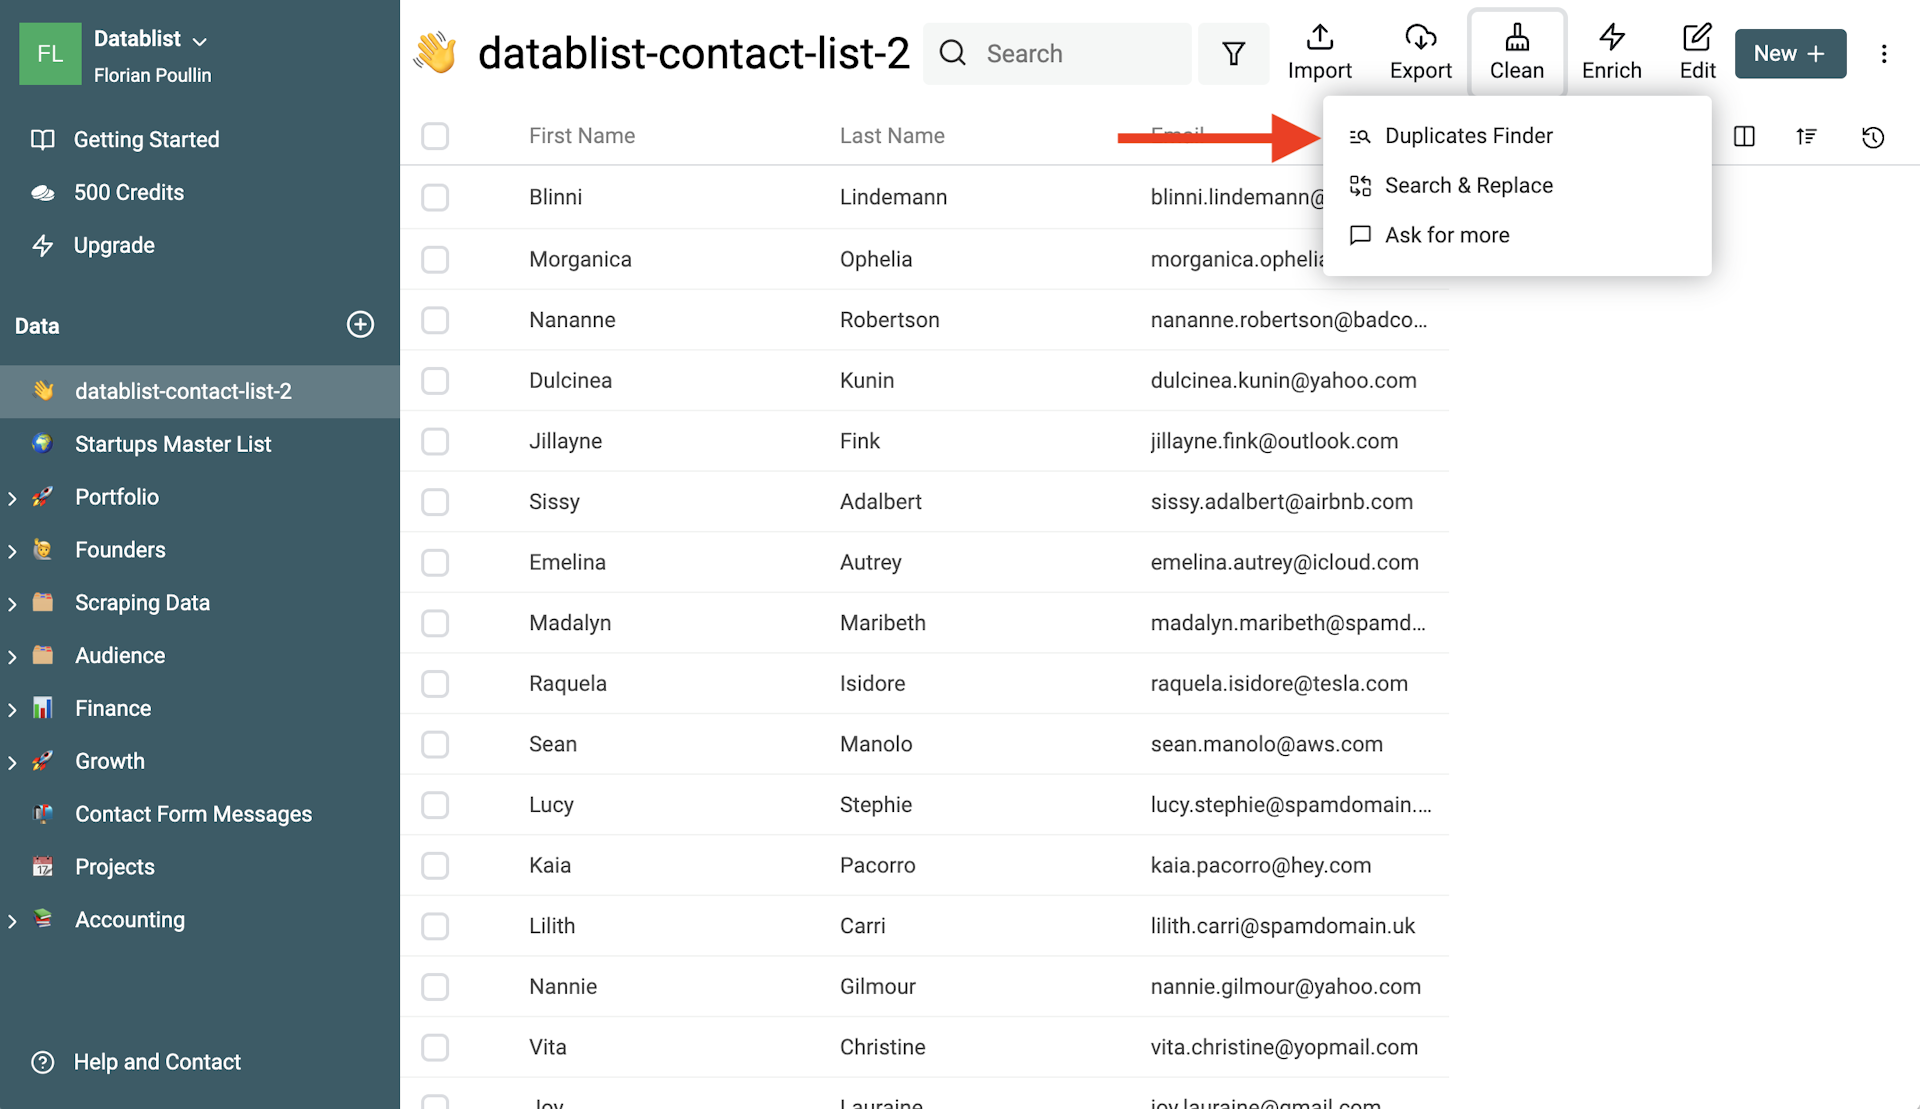
In the configuration screen, you need to select how duplicates will be checked:
- All Properties - Look for full items similarity: Two items would be considered similar when all of their properties match.
- Selected properties - Two items would be considered similar when all of their properties match.
In our example, two contacts are duplicates if they share the same email address. So, pick the Selected Properties mode and select the Email property.
Run the duplicates check to see a preview of all duplicates found in the collection.
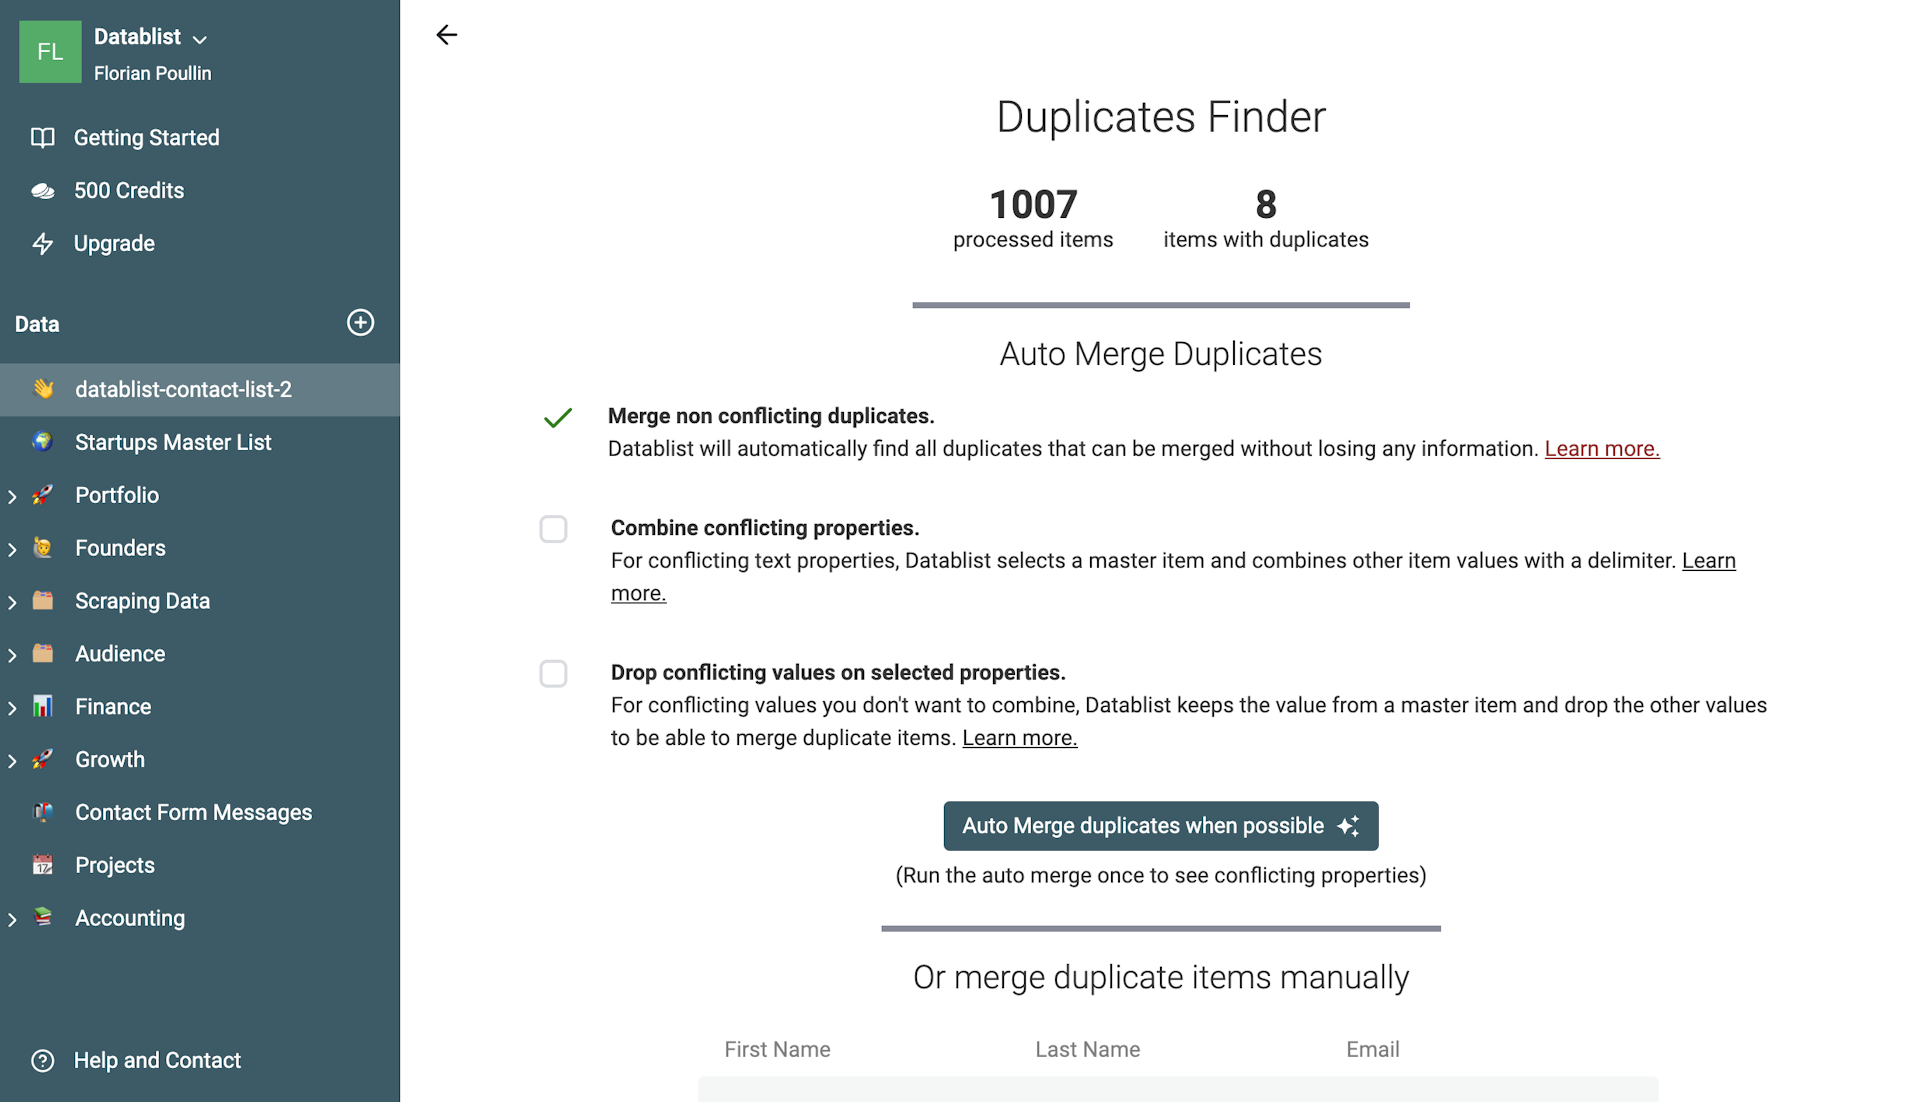
If duplicates are found, several actions are available:
- Merge or consolidate duplicate items
- Remove duplicate items
- Edit them
Datablist has an automatic algorithm to dedupe your data. Please visit our documentation to learn more about deduplication.
After the automatic merge, finish the cleaning with the manual merging assistant. To merge duplicate contacts, click on the "Merge Items" button on the left of every duplicate contacts group.
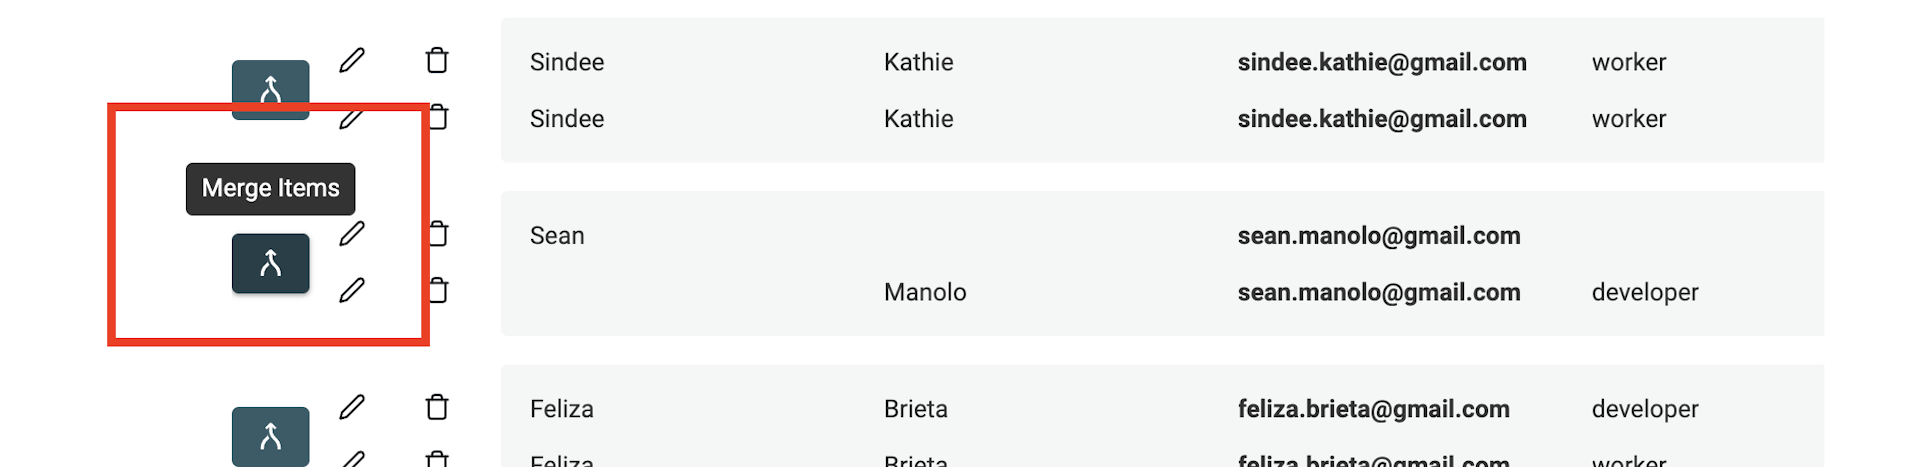
Datablist has a merging tool. On the right, a "Primary Item" is shown and on the left the remaining duplicate contacts are called "Secondary Items". Datablist elects the contact with the most data as the "Primary item".
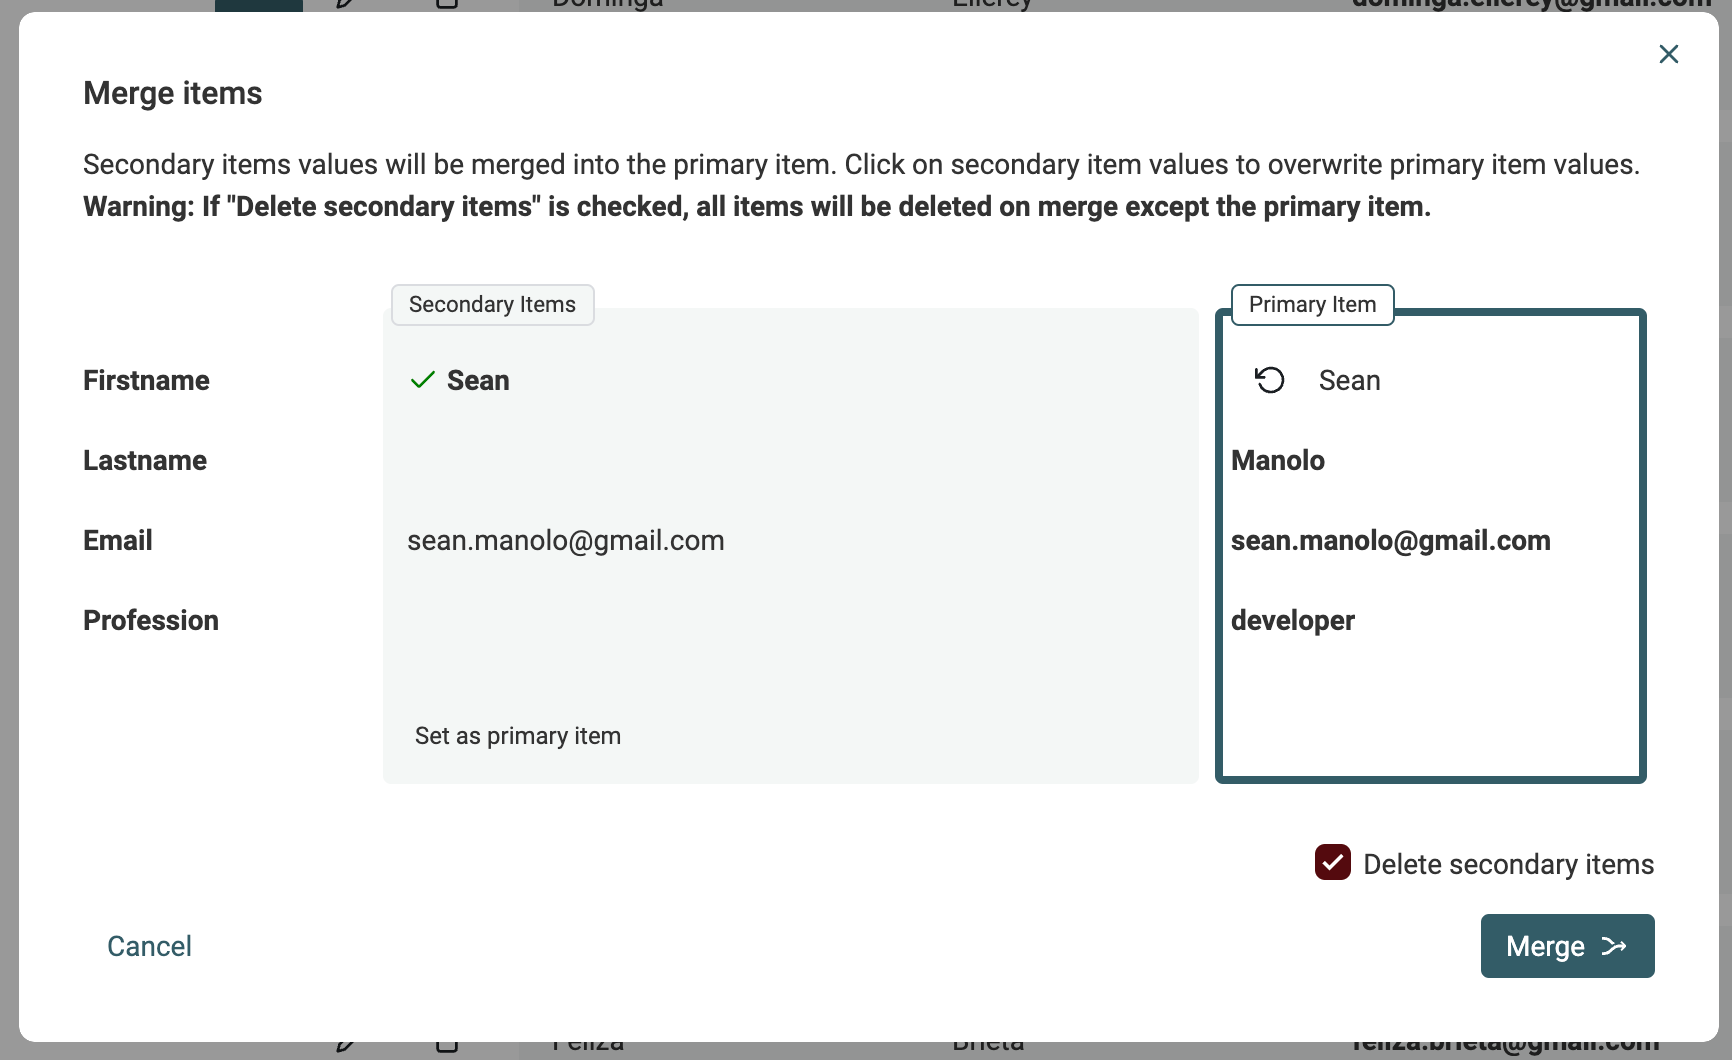
When possible, property values from secondary items are auto-selected to be merged into the primary items. If several values conflict, you will have to make a decision and select which value to keep.
If the resulting "Primary item" suits you, click the Merge button to confirm the merge process. All the secondary items will be deleted to keep only one combined item.
Once all the duplicates have been processed, go back to the collection.
Check this video for the whole process:
Step 3: Free email list cleaning
Now you have a collection on Datablist with all the email addresses and no duplicates, it's time to clean it!
Notes
You must be registered to use the email verification service. Sign up (it's free). If you already have an anonymous collection, import it into your workspace.
What does the service check?
Datablist has a built-in free email verification service. This free service does 5 analysis:
- Email syntax analysis
- Domain MX records check
- Disposable providers check
- Return the name of the email provider
- Is the email address a Business Email or from a generic provider (Gmail, Yahoo, etc.)
Email syntax analysis
The first check is to ensure the email conforms to the IEFT standard and does a complete syntactical analysis.
This analysis will flag addresses without the at sign (@), with invalid domains, etc.
Check domain MX records
The second check is to detect if the domain can receive emails. A valid email address must have a corresponding domain name with configured MX records. Those MX records specify the mail server accepting the email messages for the domain. Missing MX records indicate an invalid email address.
For every email address domain, the service checks the DNS records and looks for the MX ones. If the domain doesn't exist, the email will be flagged as invalid. If the domain exists and doesn't have a valid MX record, it will also be flagged as invalid.
Check disposable providers
The third check is to detect temporary emails. The service looks for domains belonging to Disposable Email Address (DEA) providers such as Mailinator, Temp-Mail, YopMail, etc.
The current database lists about 3000 disposable provider domains and is updated regularly using this disposable domains list.
Return the name of the email provider
When you run the Free Email Validator enrichment, one of the key results you'll see is the "MX Provider" output. This field tells you which email service is responsible for handling the emails for a given domain, based on the MX records.
Email provider can be: google, microsoft, amazon, etc.
Check the enrichment documentation to learn more: Free Email Validator.
Check if the email address is a business email
Another information available with Datablist "Email Address Validation" enrichment is whether the email addresses are business email addresses or generic ones.
A business email address has a company domain (such as elon@tesla.com). When segmenting your contacts to build your lead lists, spotting the business email addresses will help you in the lead scoring.
Datablist maintains a list of all the generic email providers. It compares each email domain with this list. The email address is labeled as "Business Email" when the domain doesn't belong to the list of generic email providers.
Perform cleaning on your collection
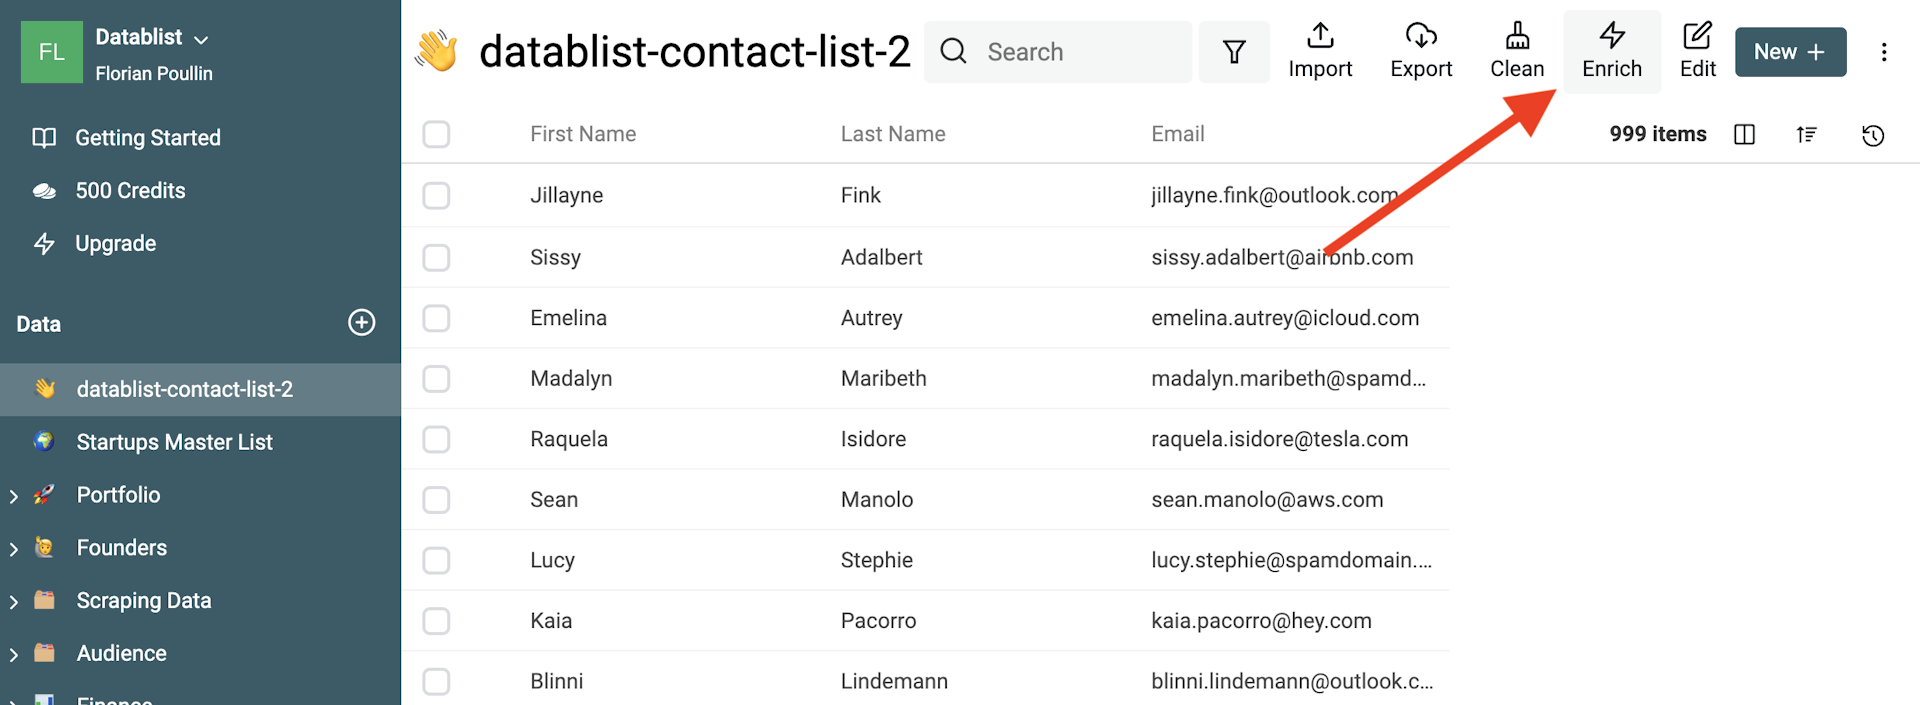
Performing an email list cleaning on Datablist is simple. Just click on the "Enrich" menu and select the "Email Address Validation" enrichment.

Once you have selected "Email Address Validation", a drawer opens on the right to configure the enrichment.
The configuration takes 2 steps:
- The configuration of
SettingsandInput Properties - The configuration of
Output Propertiesto define where to store the results from the enrichment

Settings and Input Properties
Settings
Select "Check for MX-records in email domain" in the settings to analyze the MX records.
Input Properties
Select the property from your collection that contains the email address. In this example, the collection has an "Email" property that will be matched.
👉 Click on "Continue to outputs configuration" to move to step 2.
Output Properties and Run Settings

The "Email Address Validation" enrichment returns 4 values:
- Valid Email - A Checkbox (
trueorfalse) to indicate whether the email address is valid. - Error status - A text explaining why the email address is invalid when "Valid" Email" is
false. - Business Email - A Checkbox to know if the email address is a Business Email or from a generic email provider
- Domain - Return the domain part of the email. After the @. Example: gmail.com
- MX Provider - Return the email provider. Examples: google, microsoft, ovh, etc.
- Processed - A Checkbox to flag if an item has been processed. It is useful to filter your email list and avoid running the enrichment twice on the same email addresses.
⚠️ You must configure the output properties to create new properties in your collection. Or map them to existing properties.
If you are running the enrichment for the first time, click on the + button on each output property to add the result properties to the collection.
Properties to be created are displayed on the right of your columns.

When the outputs are mapped with properties to store the results, click "Run on first 10 items". Before running the enrichment on all your items, Datablist processes the ten first items. Errors and invalid configurations are easier to detect from those first results.

If the results are correct, click "Run the enrichment on all items" to resume the process.

Here is a video of the process (this is an old Datablist version, the email verification enrichment is now accessible from the "Enrich button"):
Once the service is done, analyze all invalid emails to detect easy-fix typos.
Find and remove email aliases
Google Gmail and Microsoft Outlook (among others) let users create alias email addresses by adding +something to the email username.
For example, the Gmail email addresses john@gmail.com and john+saas@gmail.com are linked to the same inbox.
Each alias is valid, and passes the validation test, but still impacts your marketing cost and deliverability score.
Here are a few steps to remove extra alias email addresses from your contacts list.
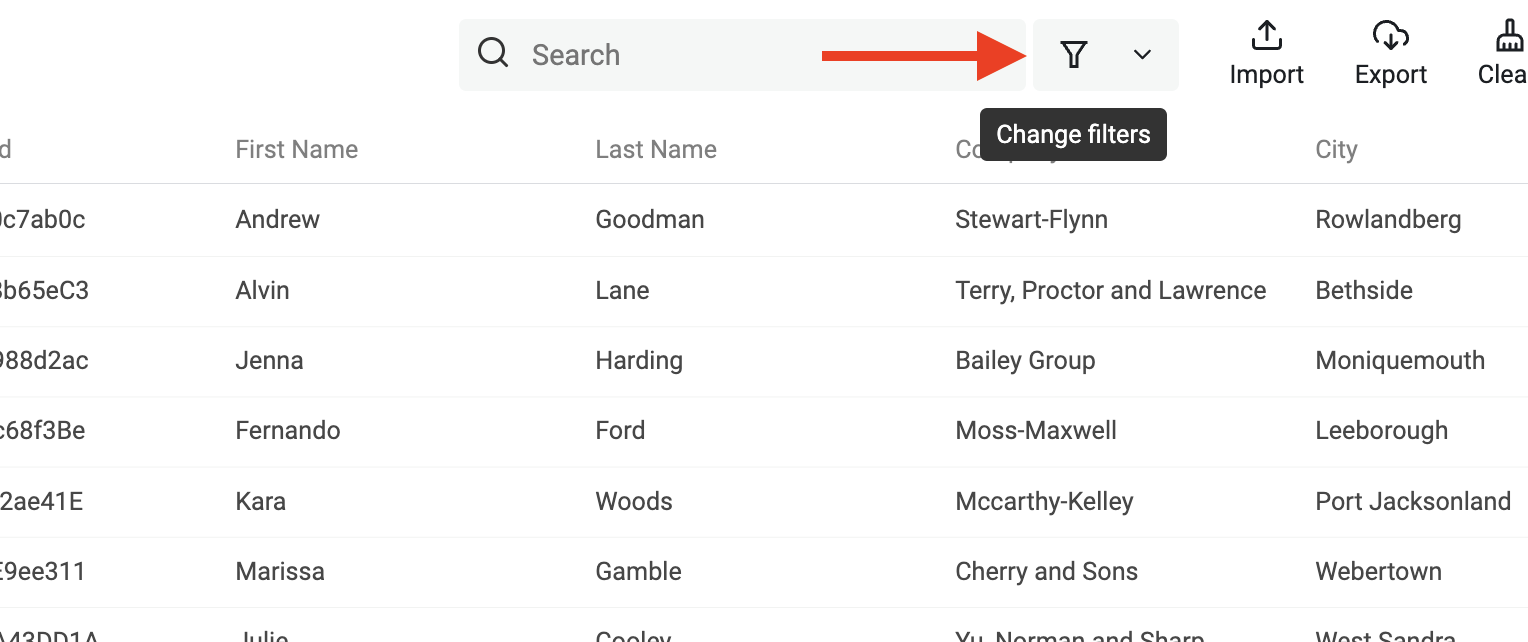
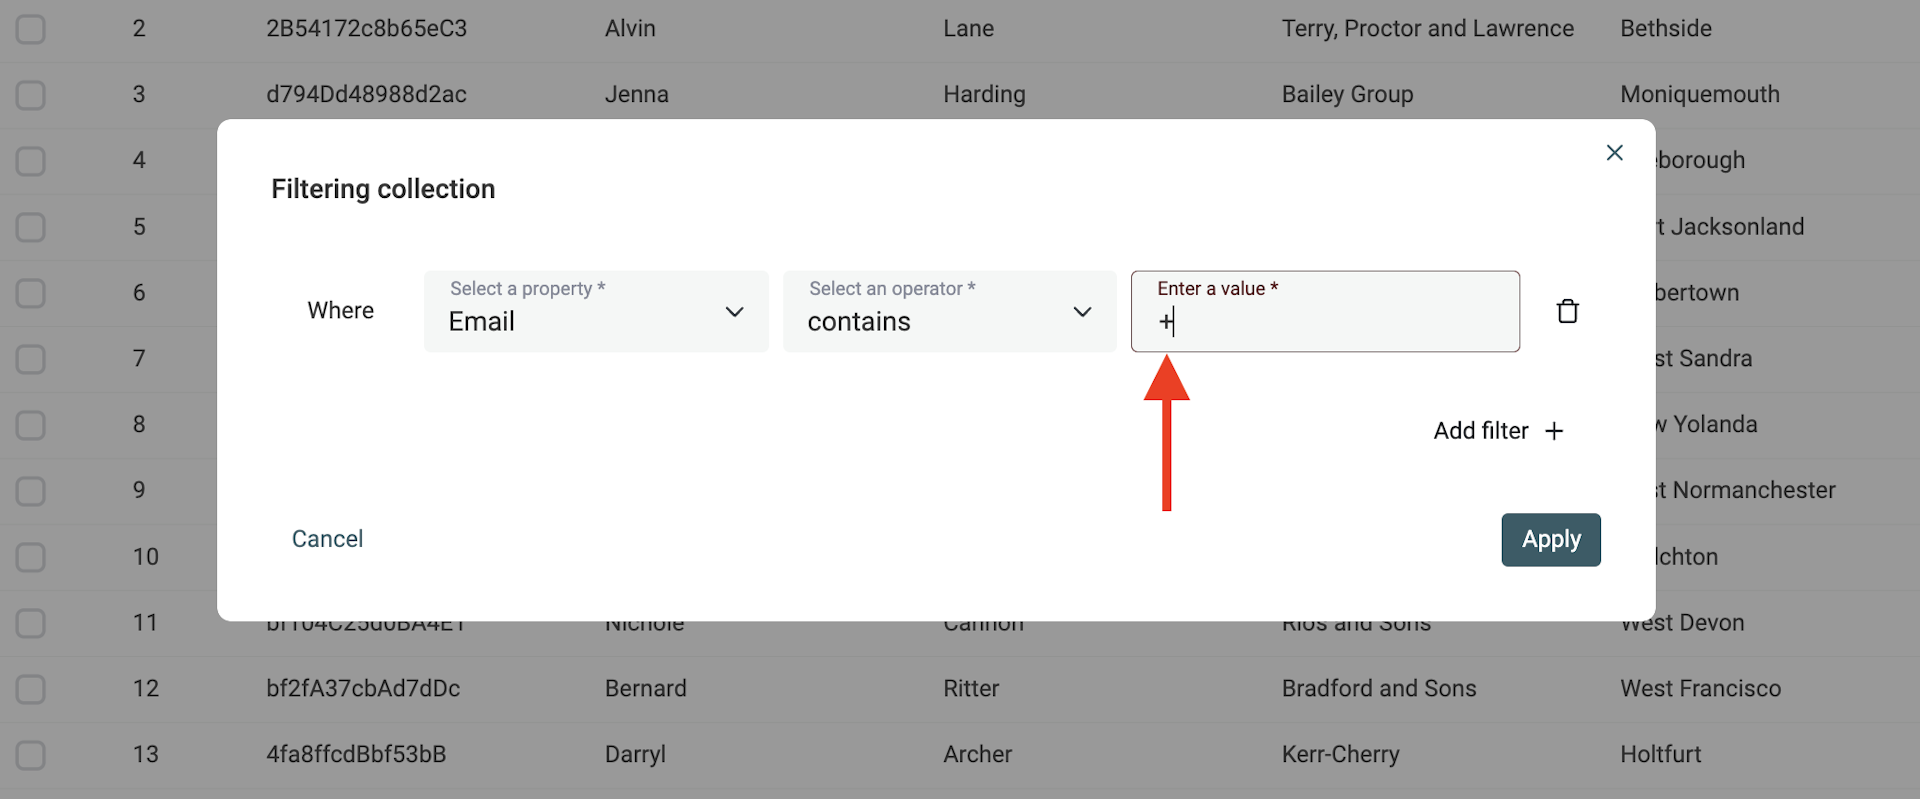
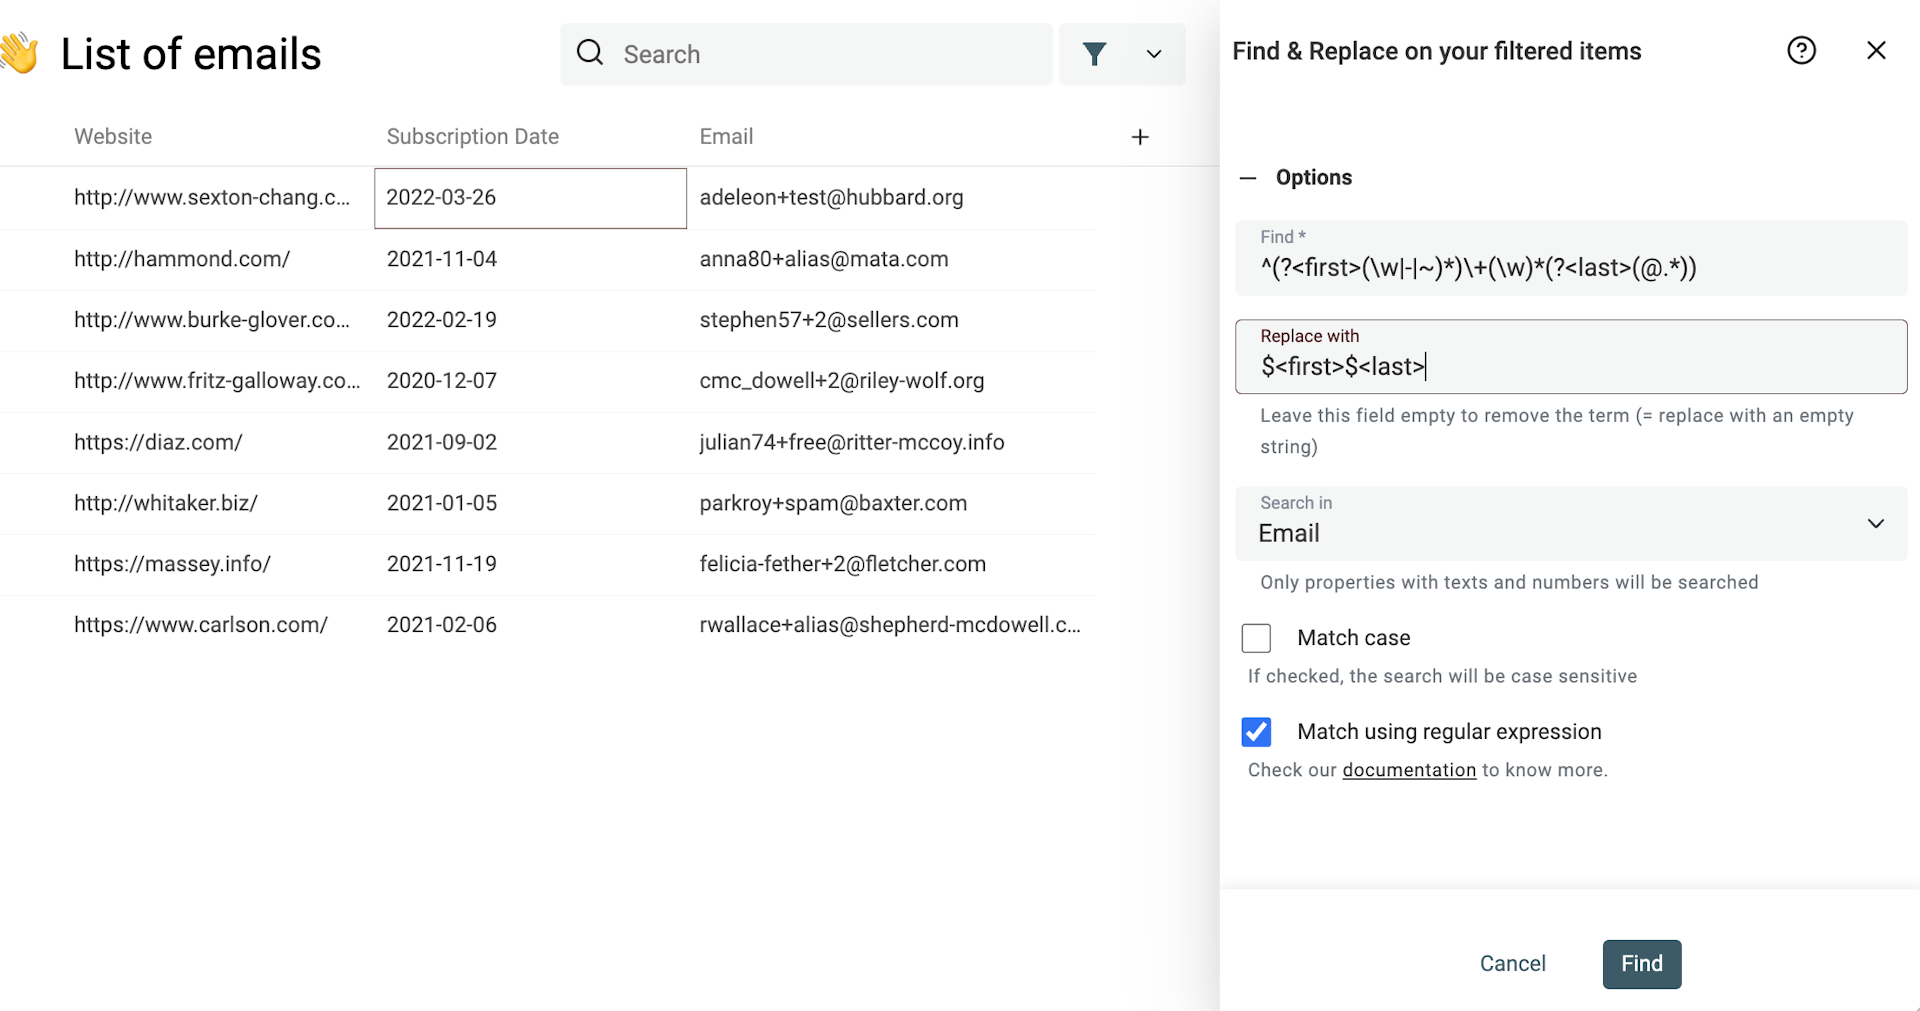
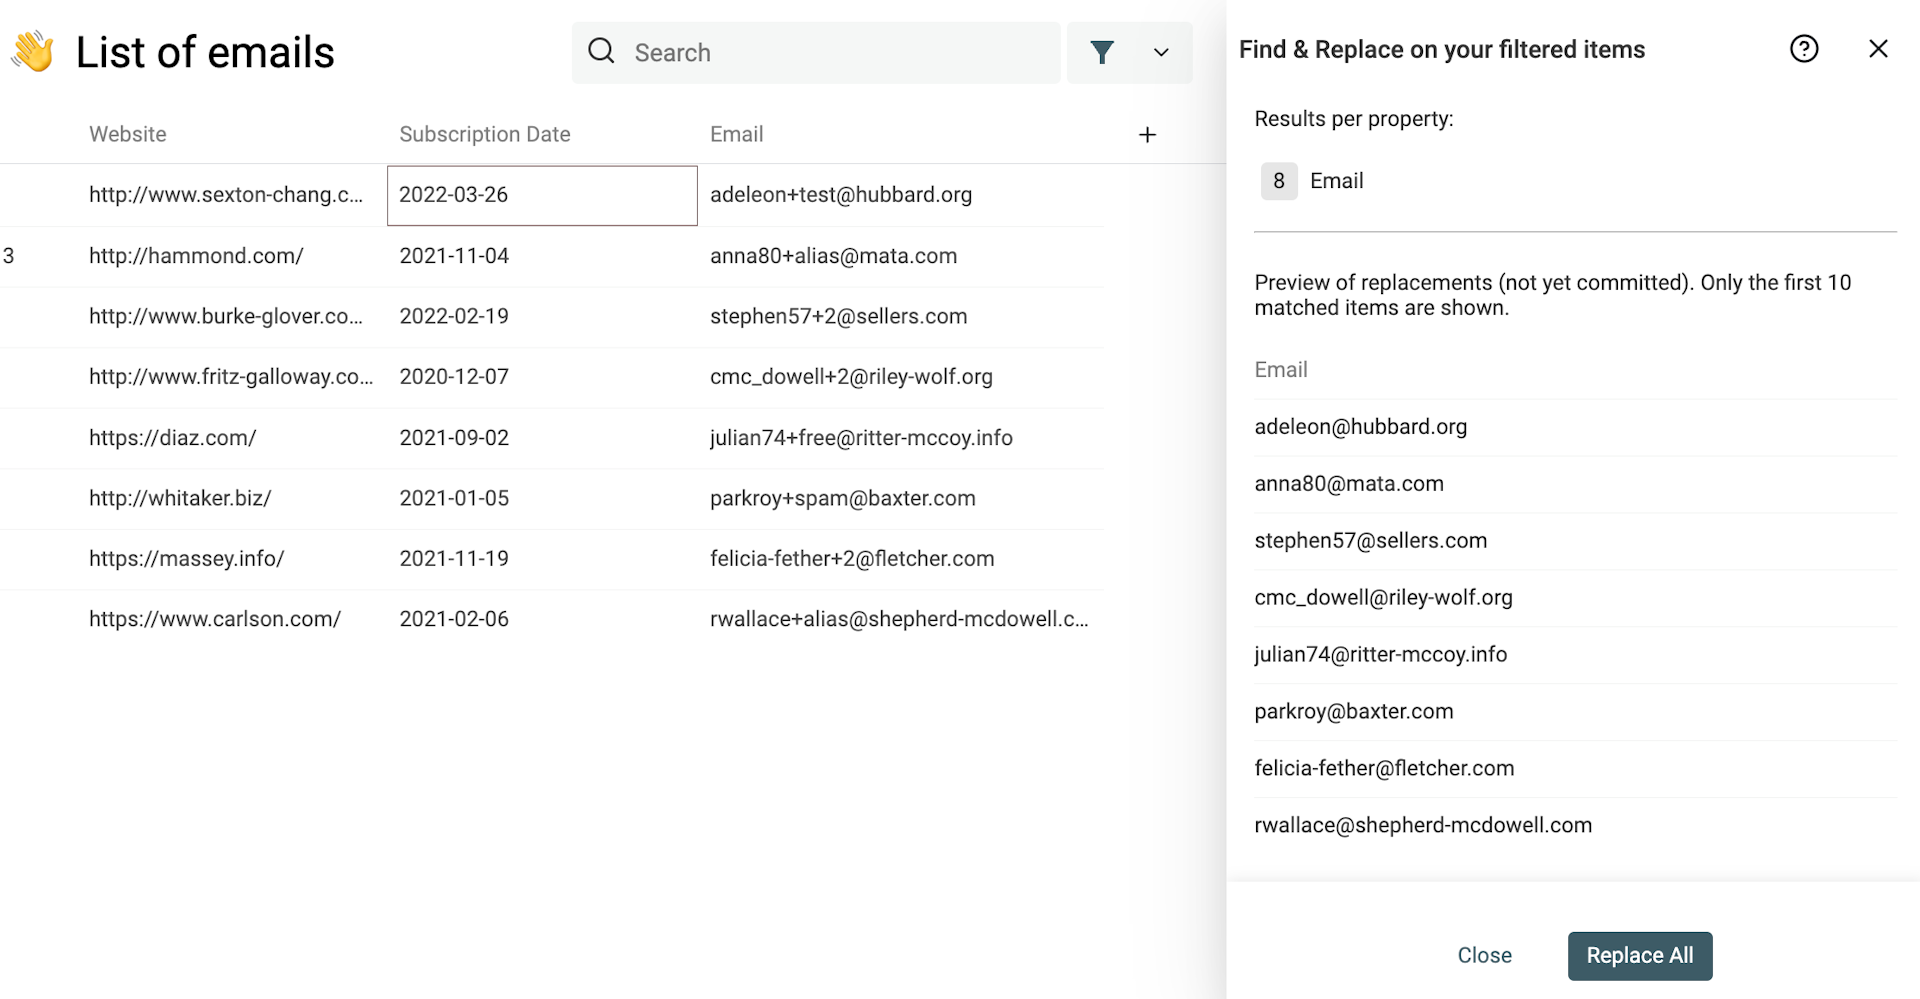
First, filter all email addresses with a + character.
Then, open the Find & Replace tool in the "Clean" menu.
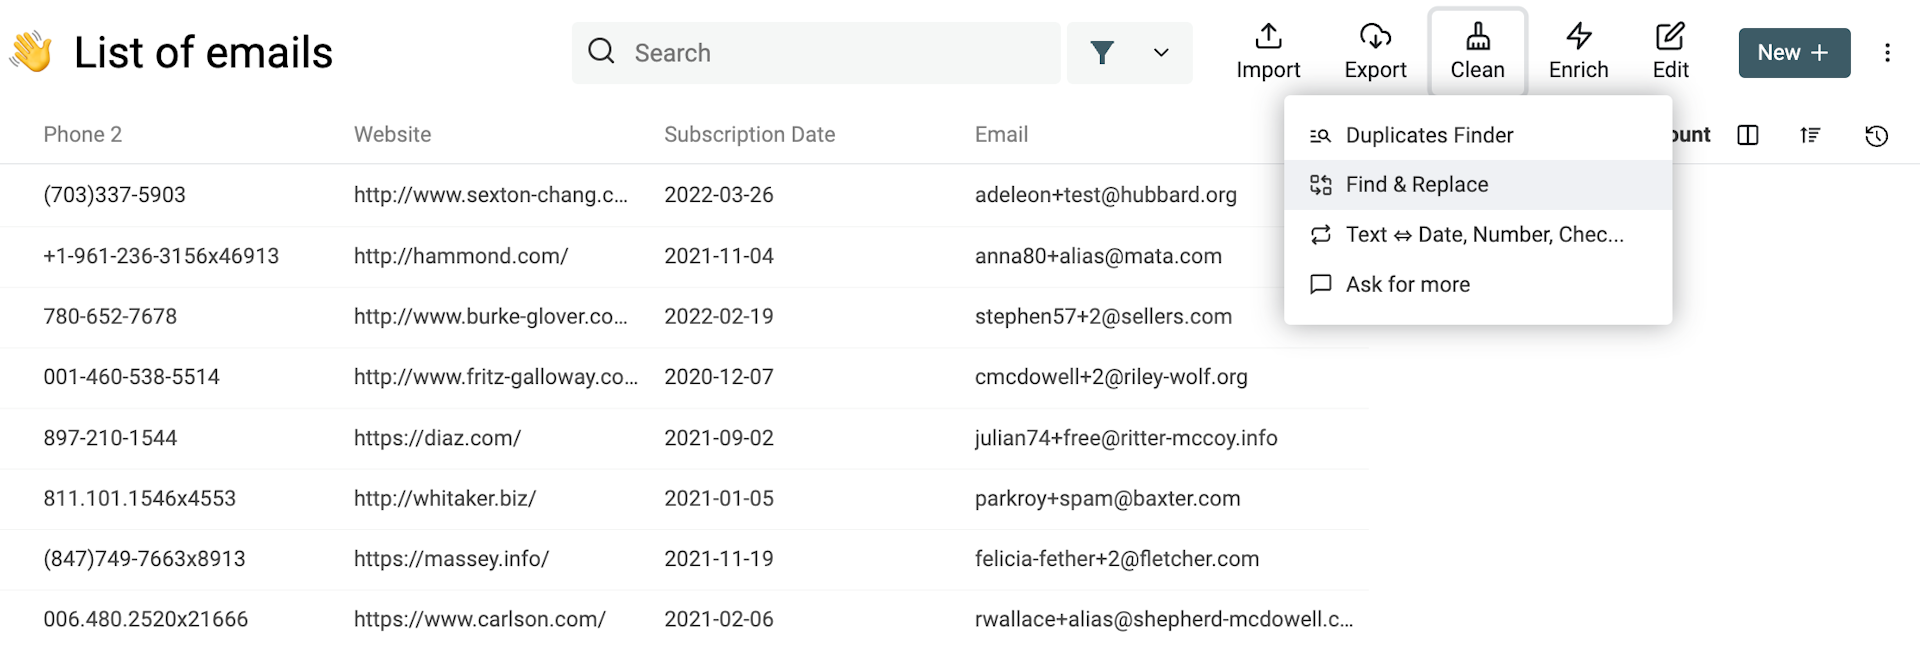
Select the option Match using regular expression, and search on your Email property. And write the following search pattern:
^(?<first>(\w|-|~)*)\+(\w)*(?<last>(@.*))
And write this string in "Replace with":
$<first>$<last>
This Regular Expression removes the +string from email addresses.
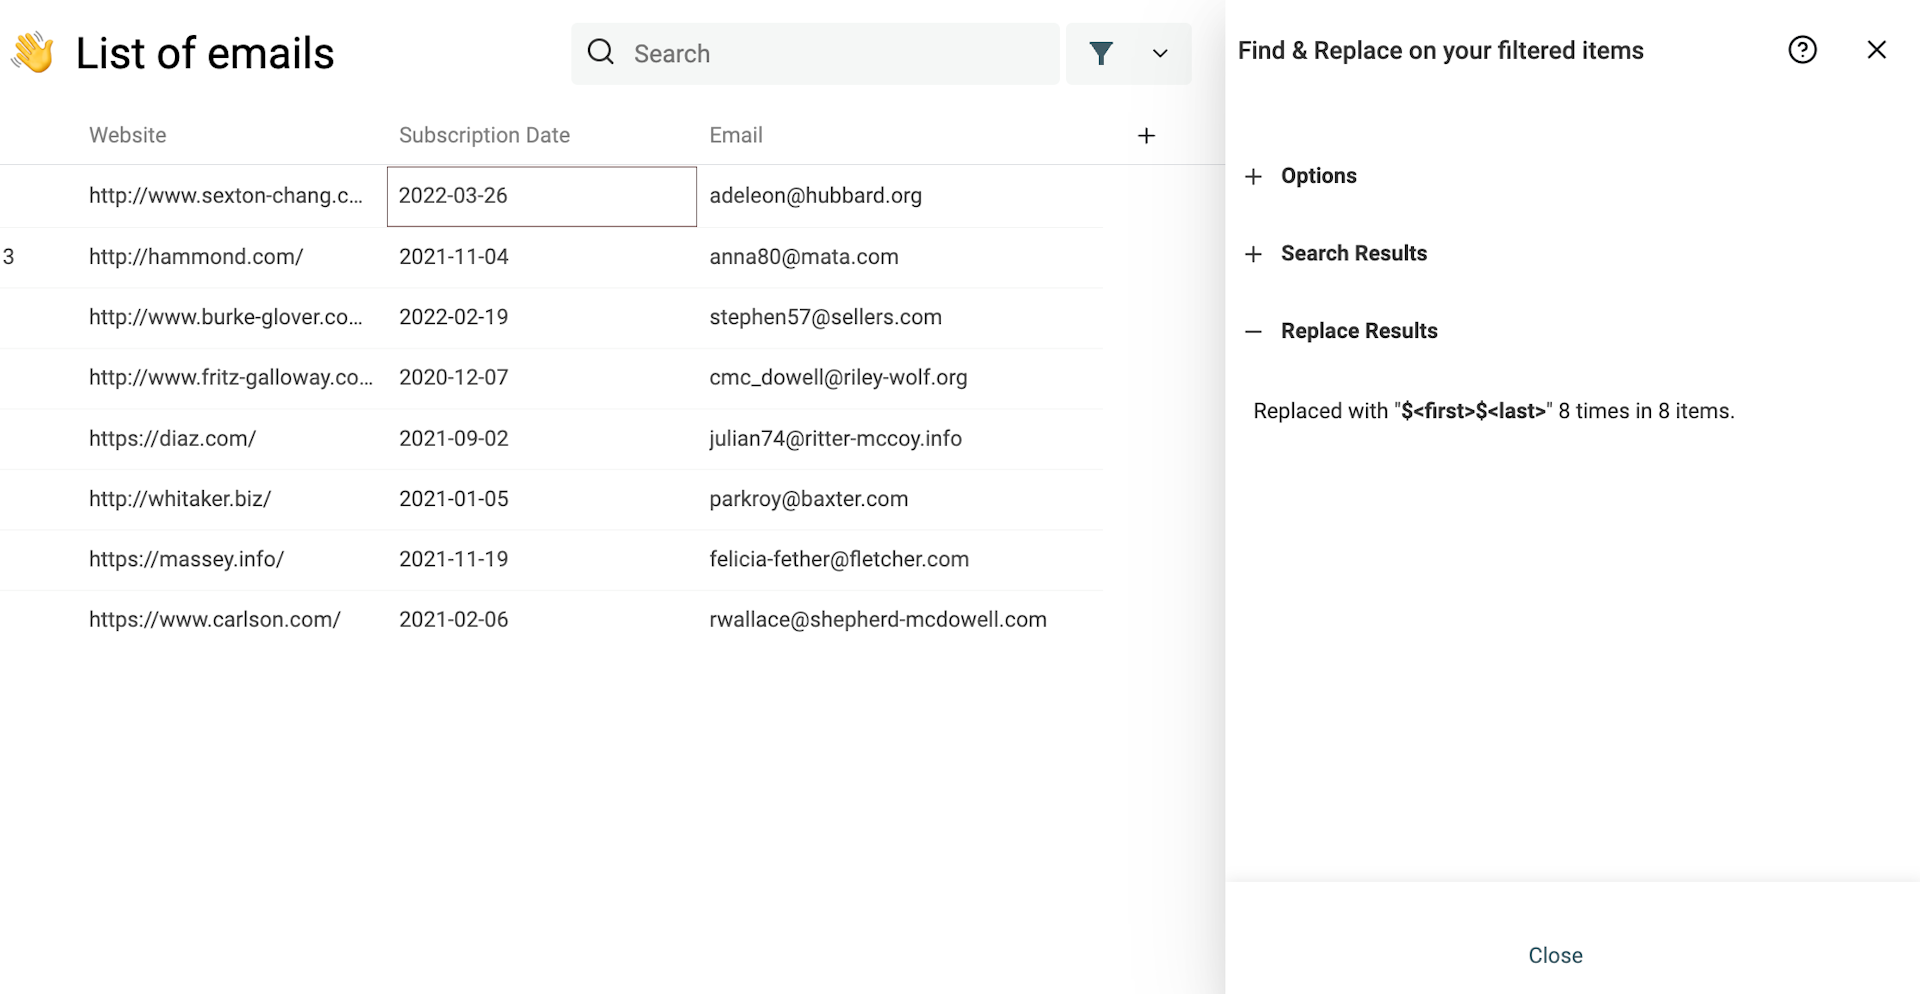
Then you can remove the filter and run the Deduplication Algorithm again on your email addresses database. Check how to deduplicate your contacts list above.
The deduplication step removes extra email addresses when a version exists without the alias, and keeps the email address when it is the only address.
Step 4: Remove unsubscribed emails
This last step is optional. You might have a dedicated list containing all unsubscribed emails that you want to remove from your main list. If your list with unsubscribed emails has a specific column like:
email           |     Unsubscribed
xxx@xxx.com     |     yes
xxx@xxx.com     |     yes
xxx@xxx.com     |     yes
It is possible to perform a join operation and add the Unsubscribed information to your contact list.
To do so, import the second CSV file and perform a join operation into the same collection.
The common property is the Email property. You will perform a "join operation" on the Email property.
During the import of the CSV files with the unsubscribed email addresses, create a new property to store the "Unsubscribed" column (click on the "+" during the mapping).
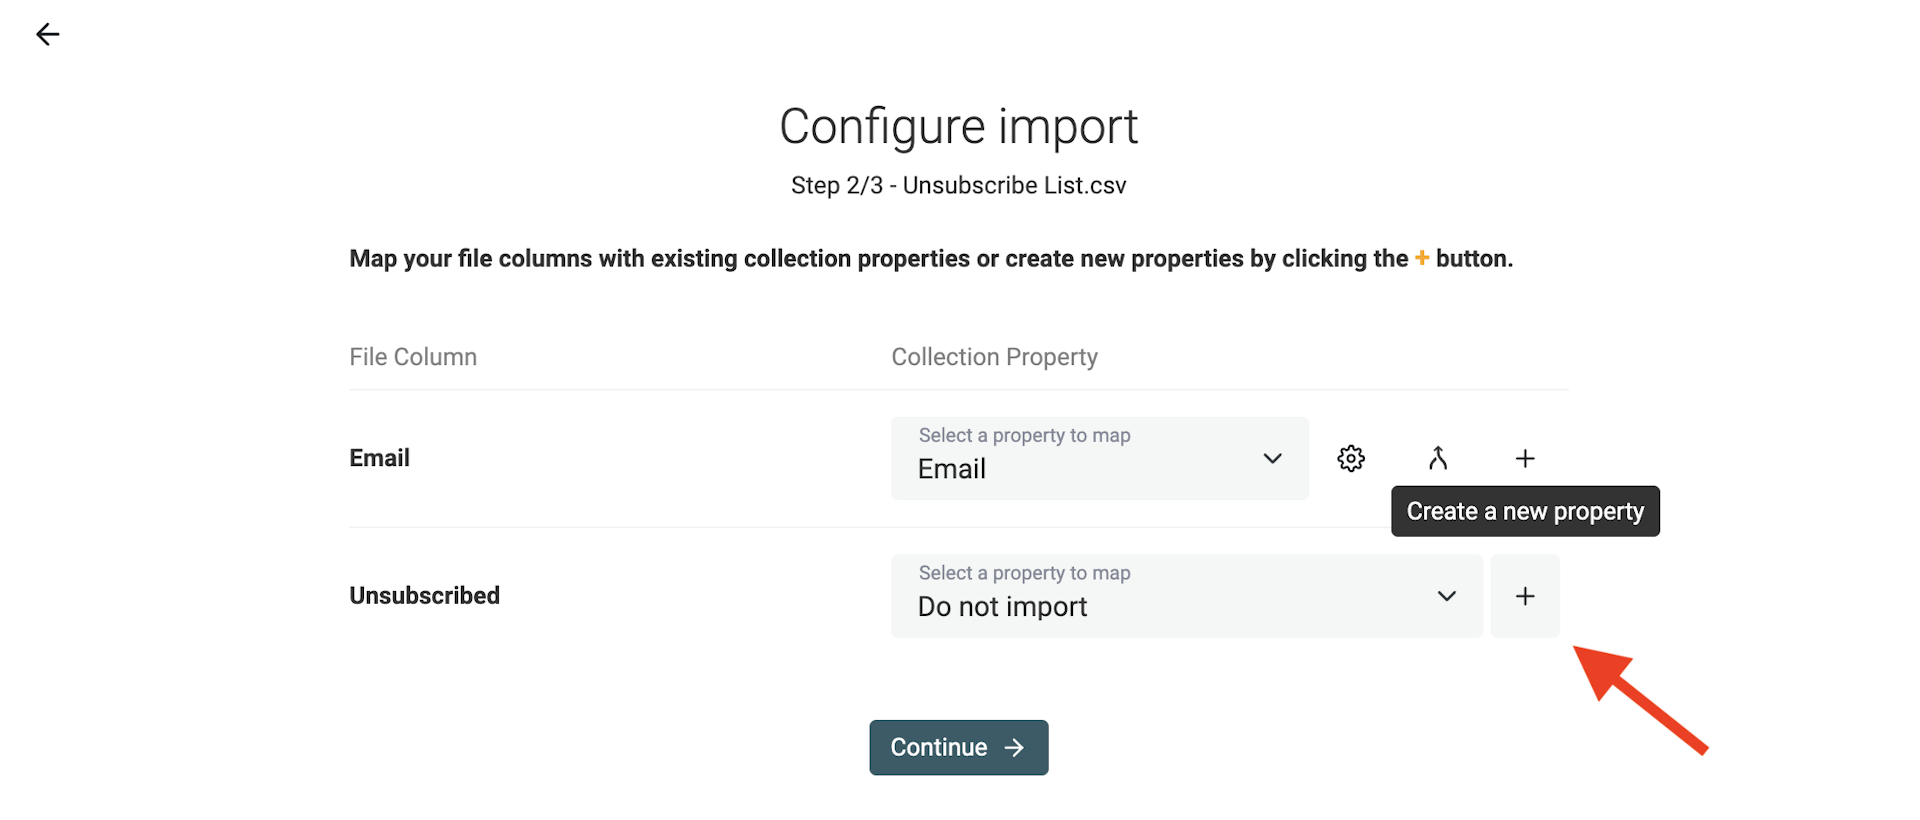
Map the "Email" column with the "Email" property if not already done. Then enable "Join on property" on it.

In the next step, you have to configure how Datablist will perform the join operation on the CSV file.
- Import all rows and match when possible - If an email address from the Unsubscribed file doesn't exist in your collection, a new item will be created.
- Import only matching rows - This is the recommended option here. If an email address from the Unsubscribed file doesn't exist in your collection, the email address will be skipped during the import.
The "Merging Mode" is to define how to merge conflicting data. This is useful when you update your collection and already have an "Unsubscribed" property that you want to update.
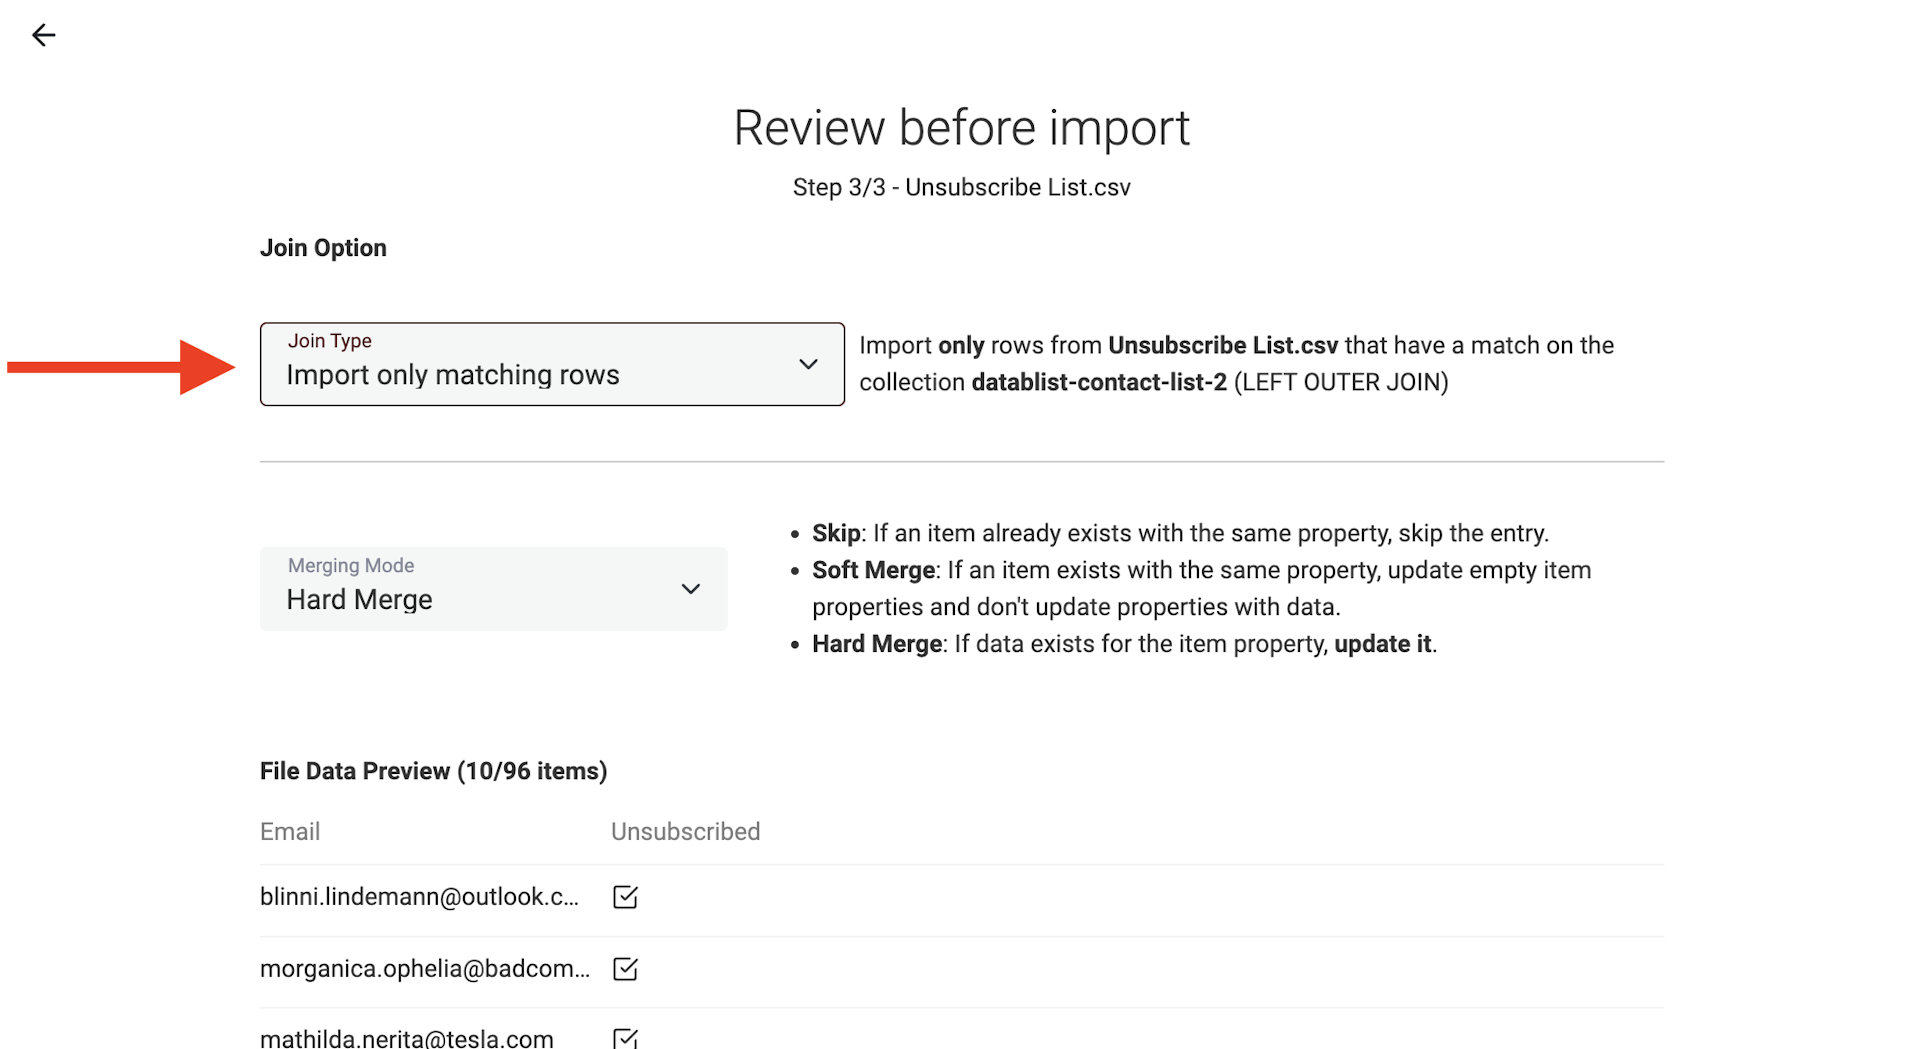
After the import, the new property "Unsubscribed" will appear. You can filter on the property and remove the contact items.

Extra Step: Automatic merge duplicates during import
To prevent and merge duplicates automatically during the import process. Check the "do not allow duplicate values" option on the Email property. With this property option, Datablist will automatically deduplicate and merge your contacts on data import.
During the import stepper, a merging option will be shown to configure how Datablist must deal with duplicates.
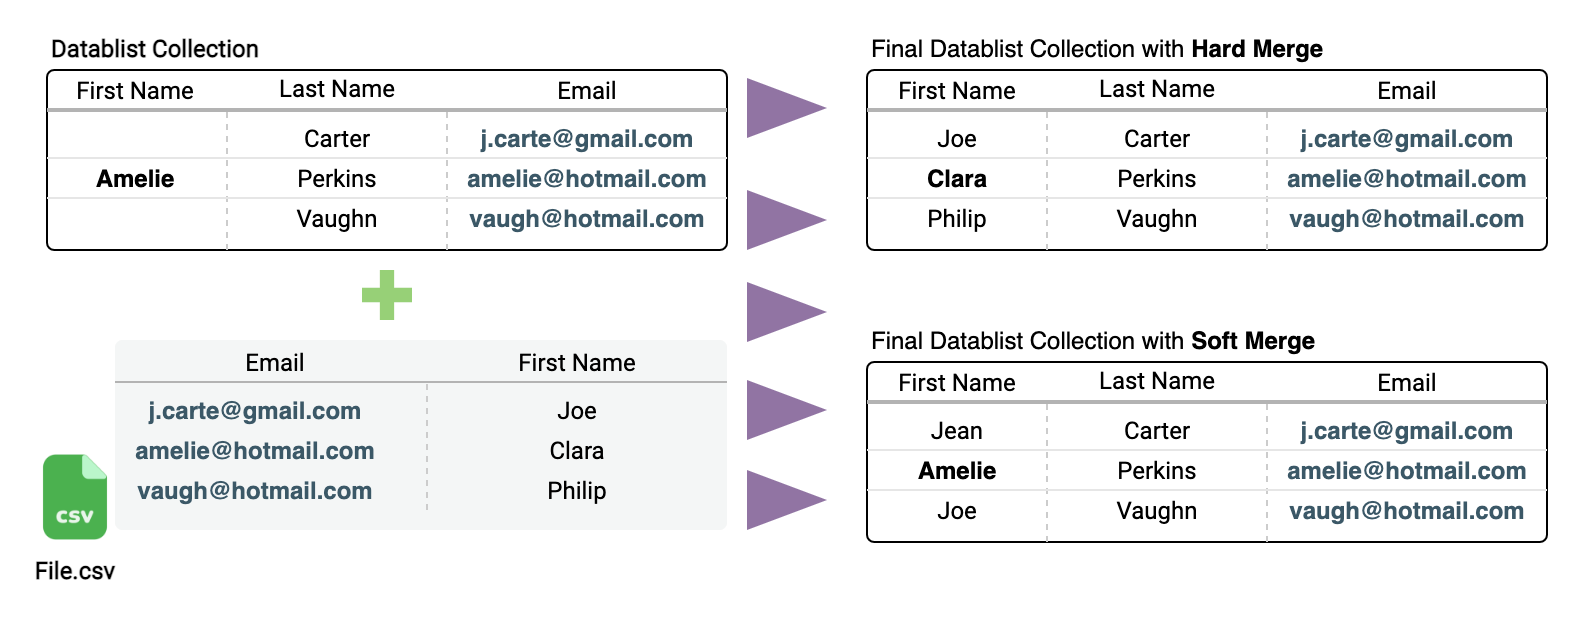
The merging option is important when your listing contains contact information in addition to the email address.
- With
Soft Merge, if a contact exists with the same email, it will not update properties with previous data (contacts already in the collection or the first contact found in the CSV). This is the default setting. - With
Hard Merge, if data exists with the same email, it will update it.
If you have any feedback on this guide or if you have questions, please contact us.