
The CSV file format is a standard to exchange structured data between companies or different software applications. It is text-based and uses punctuation delimiters to separate columns.
Here is an example of CSV file data:
firstName, lastName, email
Joe, Vaughn, vaugh@hotmail.com
Bob, Cunnighan, bobc@gmail.com
CSV files can be exported from most tools dealing with data, including CRM, Order Management System, Spreadsheets (Google Sheets or Microsoft Excel), and financial products. In the future, we might have unified data models to transfer structured items between applications. In the meantime, we must rely on CSV files.
When it comes to manipulating CSV files, the go-to solution is spreadsheet. Loading a CSV file into Google Sheets or Microsoft Excel is straightforward. However, those tools are limited when it comes to two simple operations:
- Joining CSV files by a unique column
- Deduplicate and merge CSV entries on a column unique constraint
If you only need to compare two CSV exports and see added, removed, or changed rows, use the CSV Diff Tool instead of joining them.
When performing a join operation, we are using a common column to combine data from several sources. Spreadsheets cannot define a unique constraint on a column, therefore provide limited support for joining CSV or deduplication.
This guide contains 2 parts:
- Join CSV files on a common column with Datablist
- Join CSV files using Google Sheet (or Microsoft Excel)
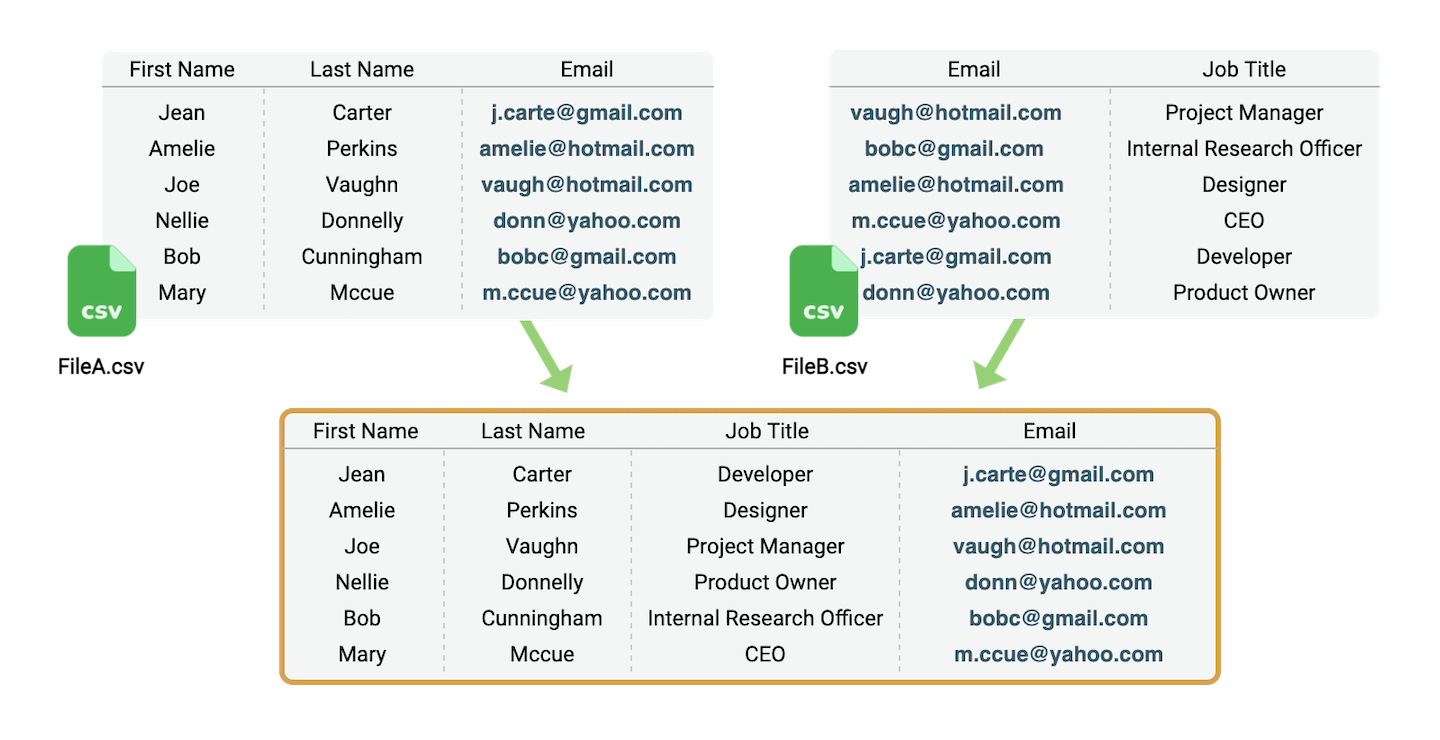
In this tutorial, we use 2 demo CSV files:
Solution 1: Join CSV files on a common column with Datablist
Data manipulation is simple with Datablist. Let's see how you can join CSV files by a unique identifier. Open Datablist (No signup required) to get started.
Step1: Load your first CSV file
The first step is to create a collection to pour in all your CSV data. Click the + button in the sidebar to create a new collection.
Once your collection is created, go to the "Import CSV" section.
Note: Your CSV file first line must contain column names.
Drag and drop a CSV file or click to select a file from your computer. Once the file is loaded, check that the number of lines and columns preview displayed is correct before moving to the next step.
Map your CSV columns with collection properties or create new properties.
The last step is to click on the "Import" button to launch the import process. Your first CSV file is imported!
Step2: Define which column to use as a unique identifier
Now that you have imported your first CSV file, you can define a "unique values" constraint on a collection property. With this information, Datablist will merge new CSV imports to respect the constraint. Go to the columns configuration and edit the property that will be your unique identifier. Check the "Unique Values" attribute and save.
Step3: Load one or more CSV files
Once you have set a unique constraint on a collection property, import your other CSV files one by one in the existing collection. Create new collection properties if needed during the CSV mapping step.
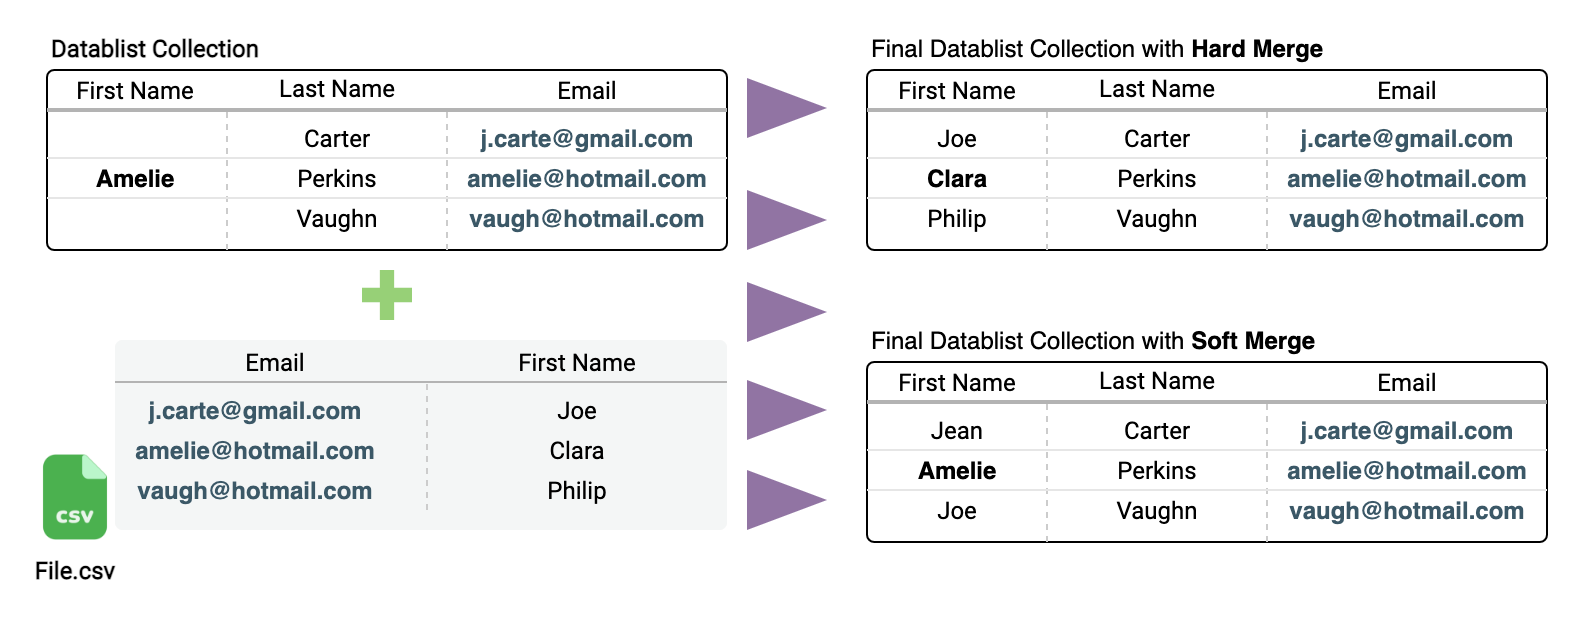
When your collection has items and has a unique constraint, you can select a merging option during a CSV file import.
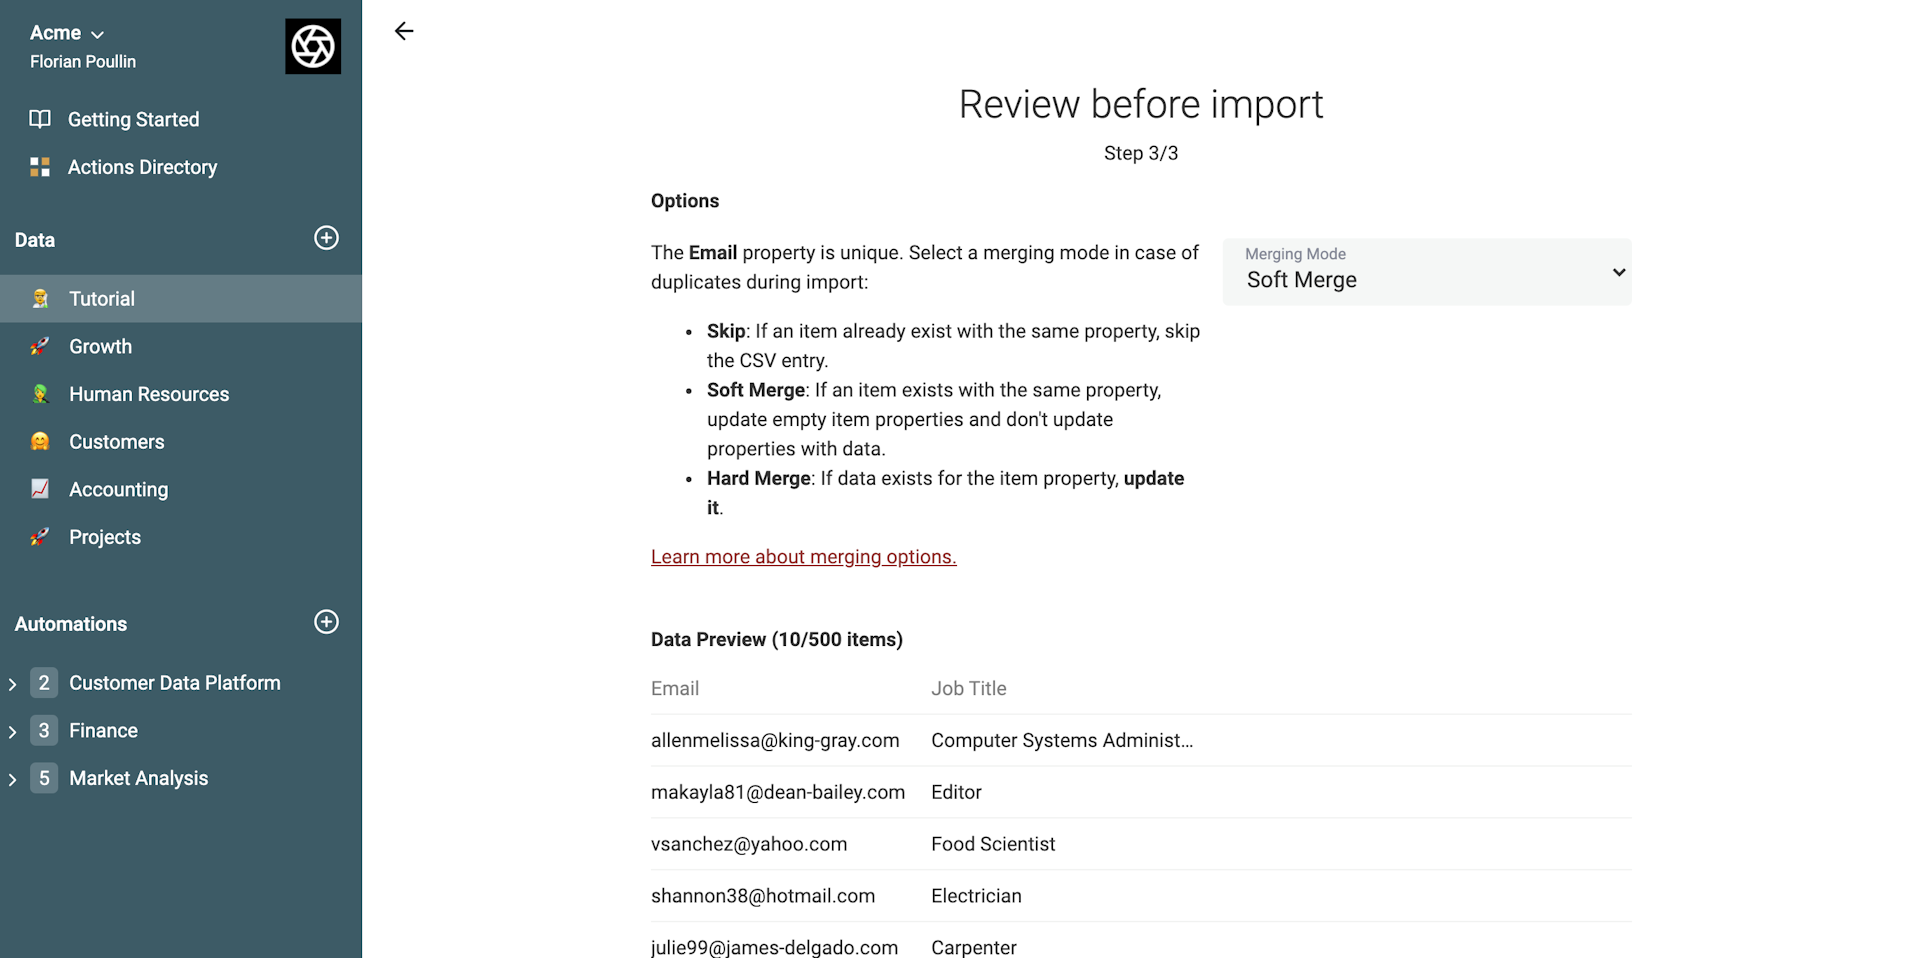
Select how data would be merged into the collection:
- Soft Merge: If data exists for the item property, don't update it. This is the default setting.
- Hard Merge: If data exists for the item property, update it
The "Skip item" option skips the row when an entry with the same identifier value is found in the collection, it must not be selected in order to join CSV files.
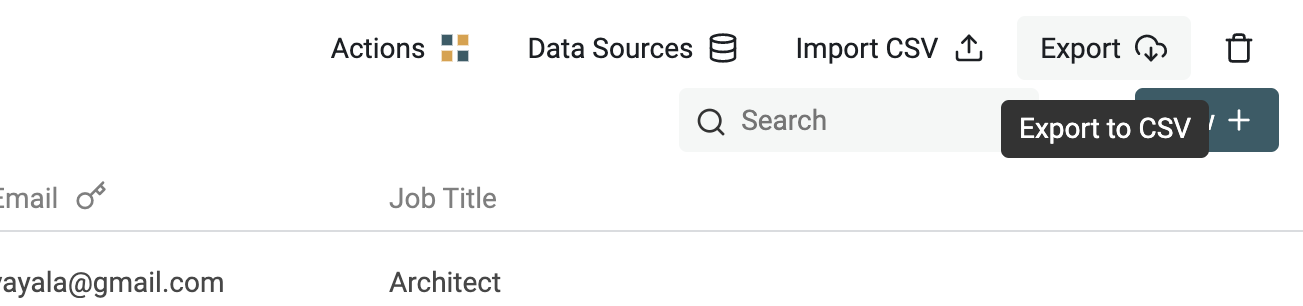
Step 4: Export to CSV if needed
Congratulations! 🎉 You've successfully combined CSV files using a common column! If you need to use the result in another tool, click on the "Export" button to export the collection as another CSV file.
Full step by step video to join CSV files with Datablist
In the video below, the property "unique values" settings is set directly during the property creation.
Solution 2: Join CSV files using Google Sheet (or Microsoft Excel)
Spreadsheet tools have limited support for merging CSV files with a common column. However, a cell formula can find a row in another table that matches a value. When applied to each row of a table, it can search in another table and return the value from any column in the matched row.
The formula is VLOOKUP and is available on Microsoft Excel and Google Sheet.
Limitations
- With spreadsheets, one CSV file is used as a master table and must contain all the possible values for the join column.
- In all the secondary tables, the join column must be the first column.
Step 1: Load your CSV files
In this tutorial, we use Google Sheets (the formula VLOOKUP is similar in Microsoft Excel).
Among your CSVs, choose the one with the most values to be used as the master table. The other will be called secondary CSV files.
First load your master CSV file with File -> Import and select your CSV (go to the Upload tab to use a CSV file from your computer).
In Import Location, select Insert new sheet(s).
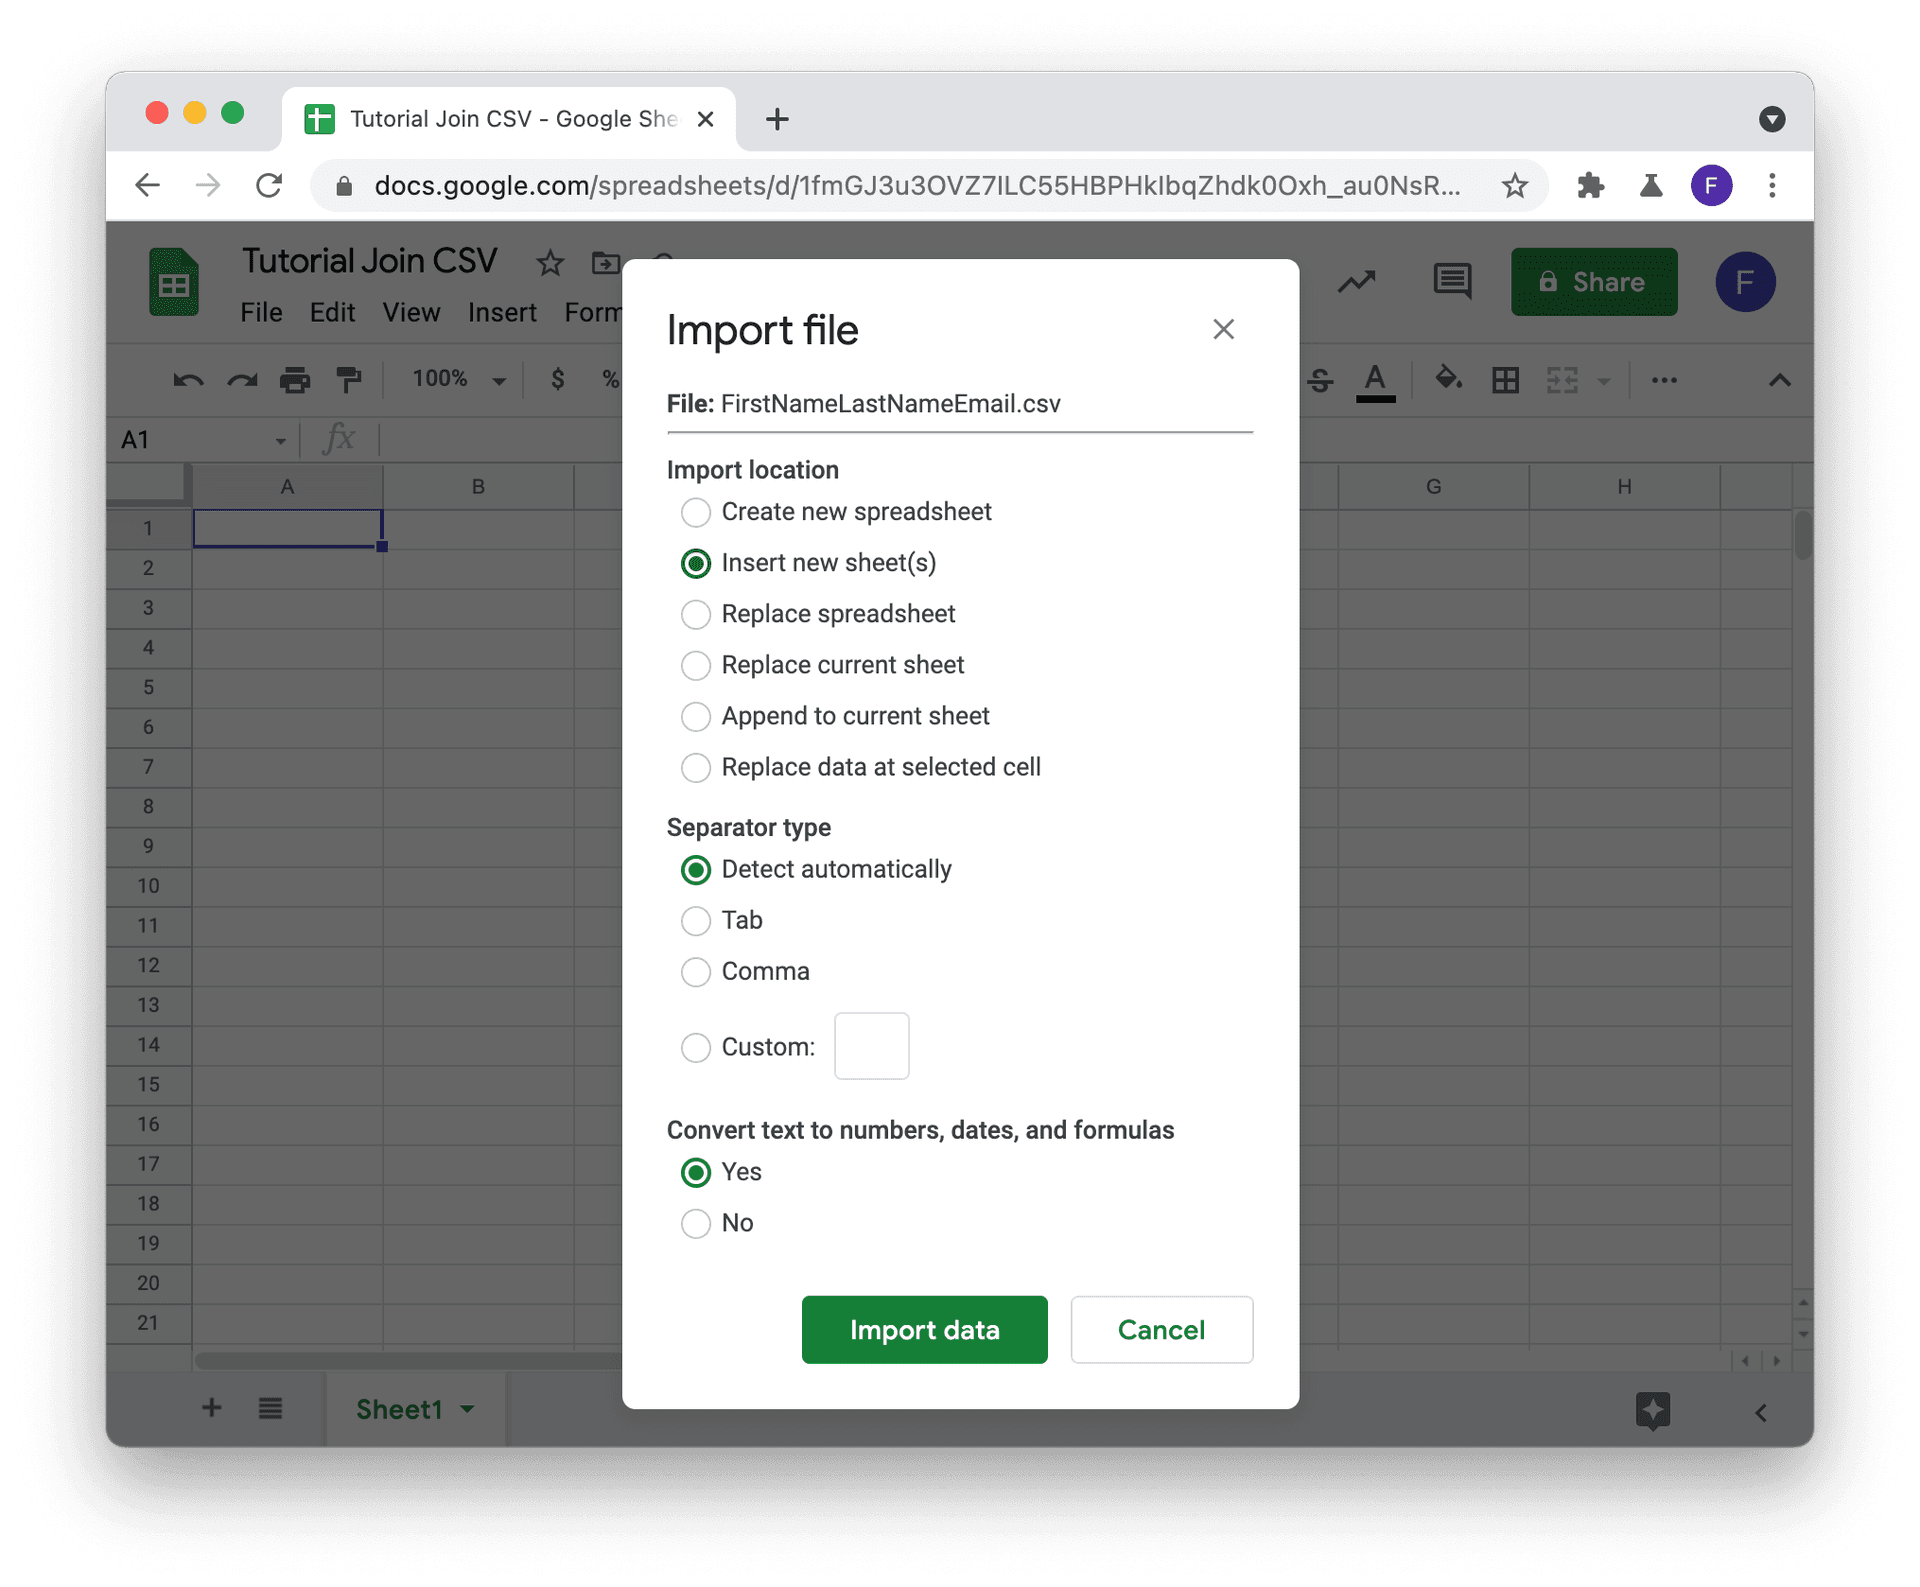
Perform this operation for your secondary CSV file(s). Each CSV file must be uploaded to a dedicated table in the the spreadsheet.

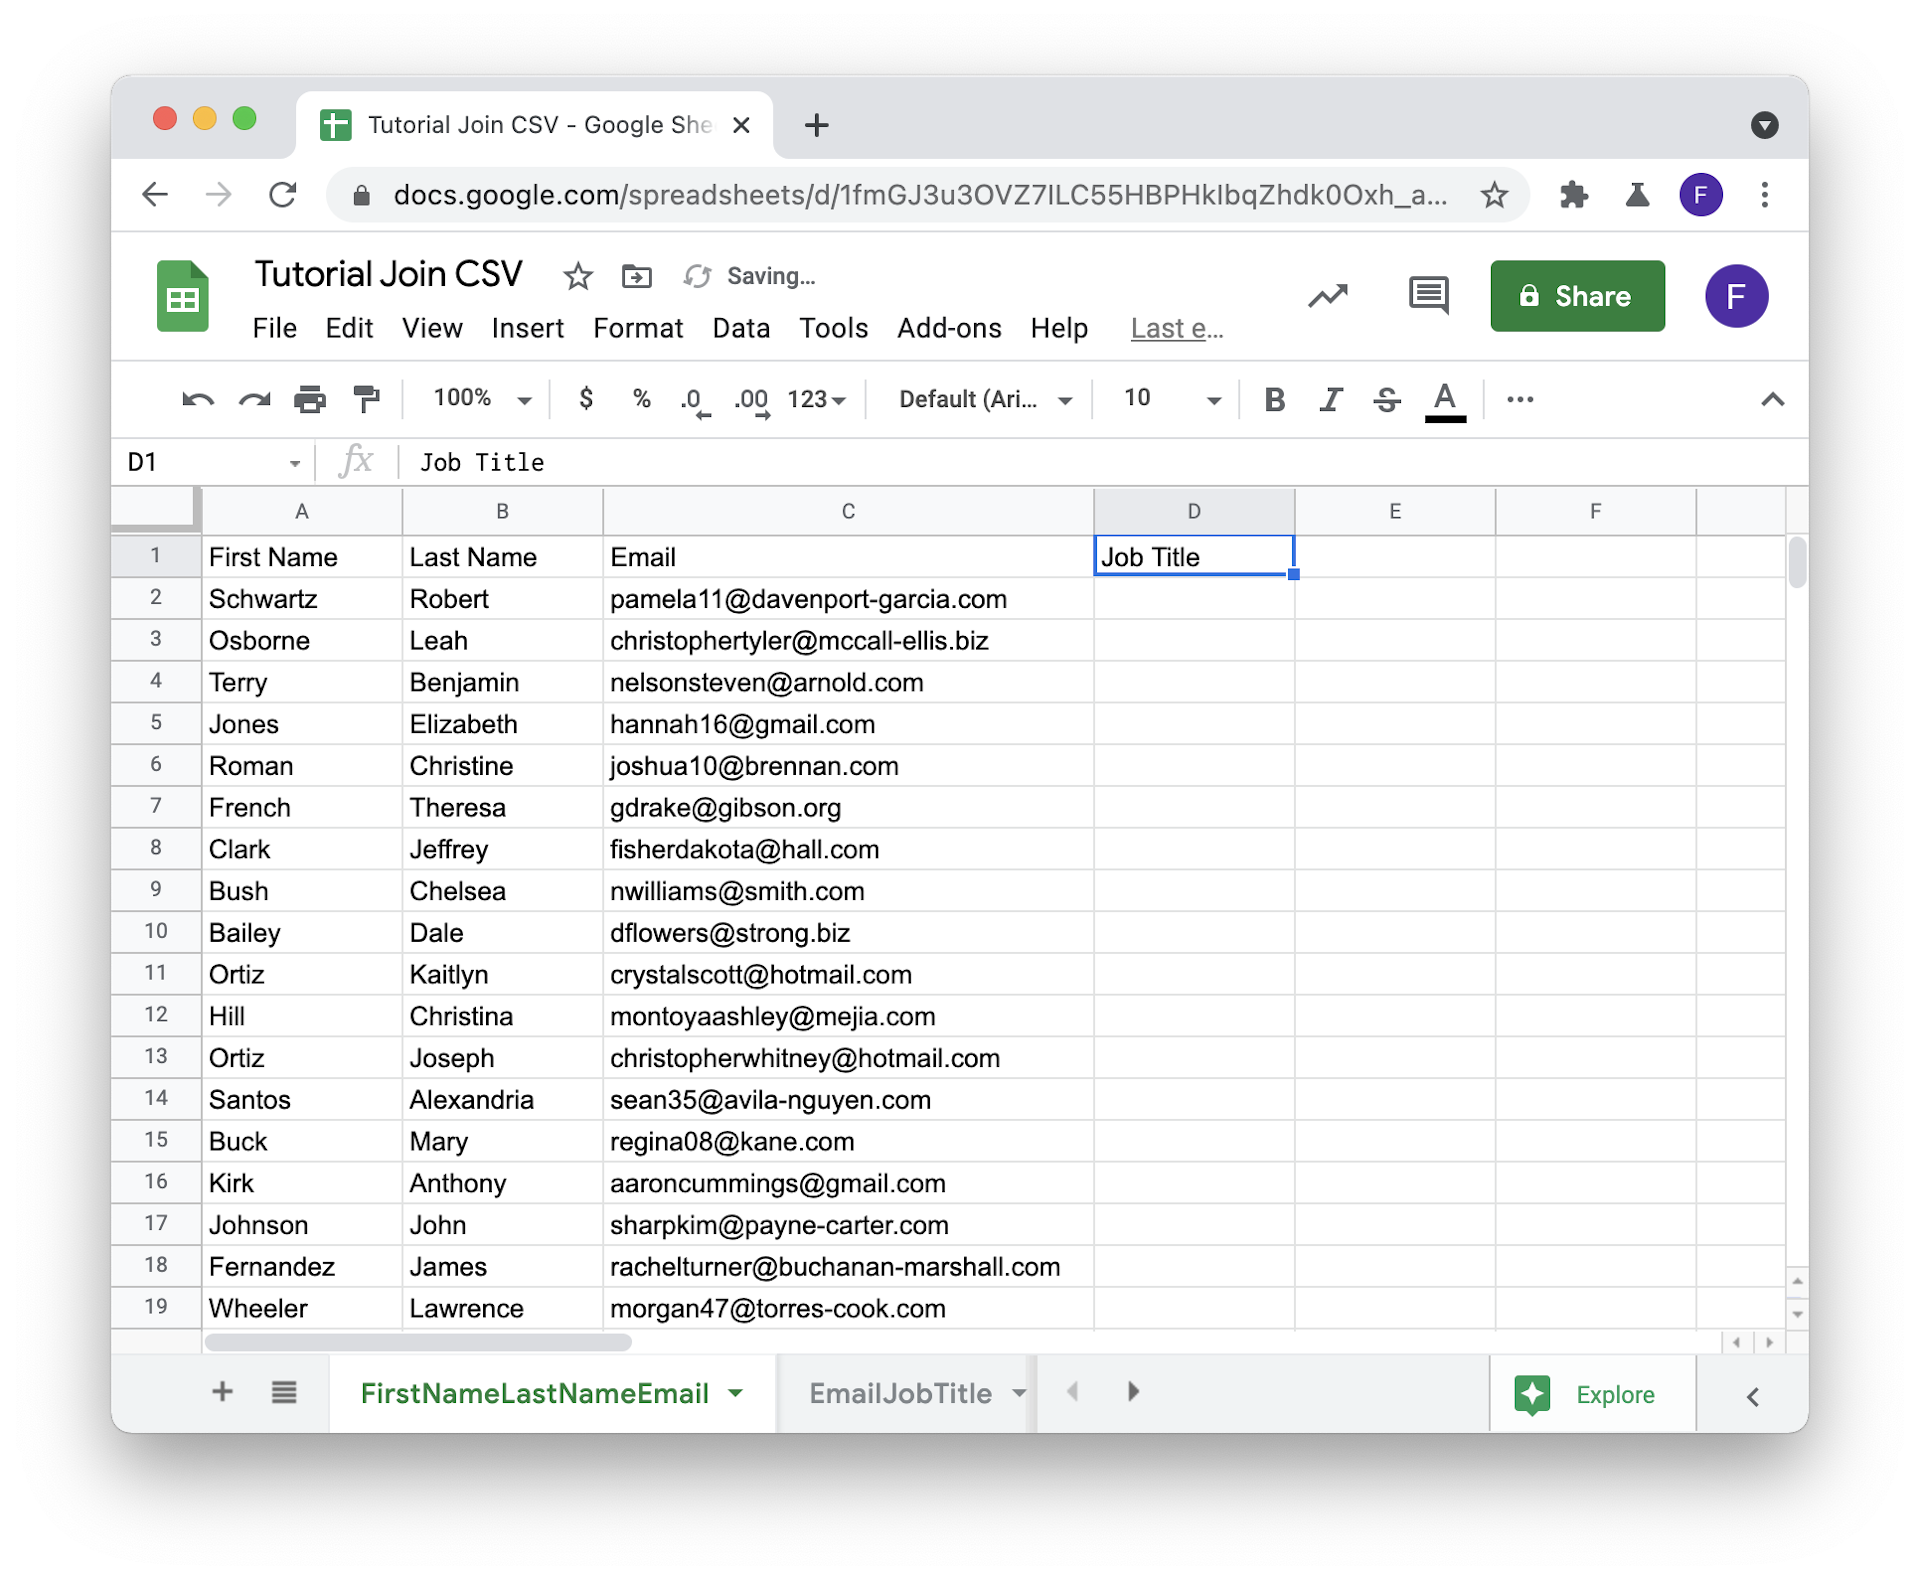
Step 2: Create new columns in the master sheet
The table with your master CSV is your master table and it will receive values from other tables. In this master table, create new columns to store data from your other tables.
For this tutorial, we want to have the Job Title data from our secondary table in our master table, so we add an empty Job Title column.
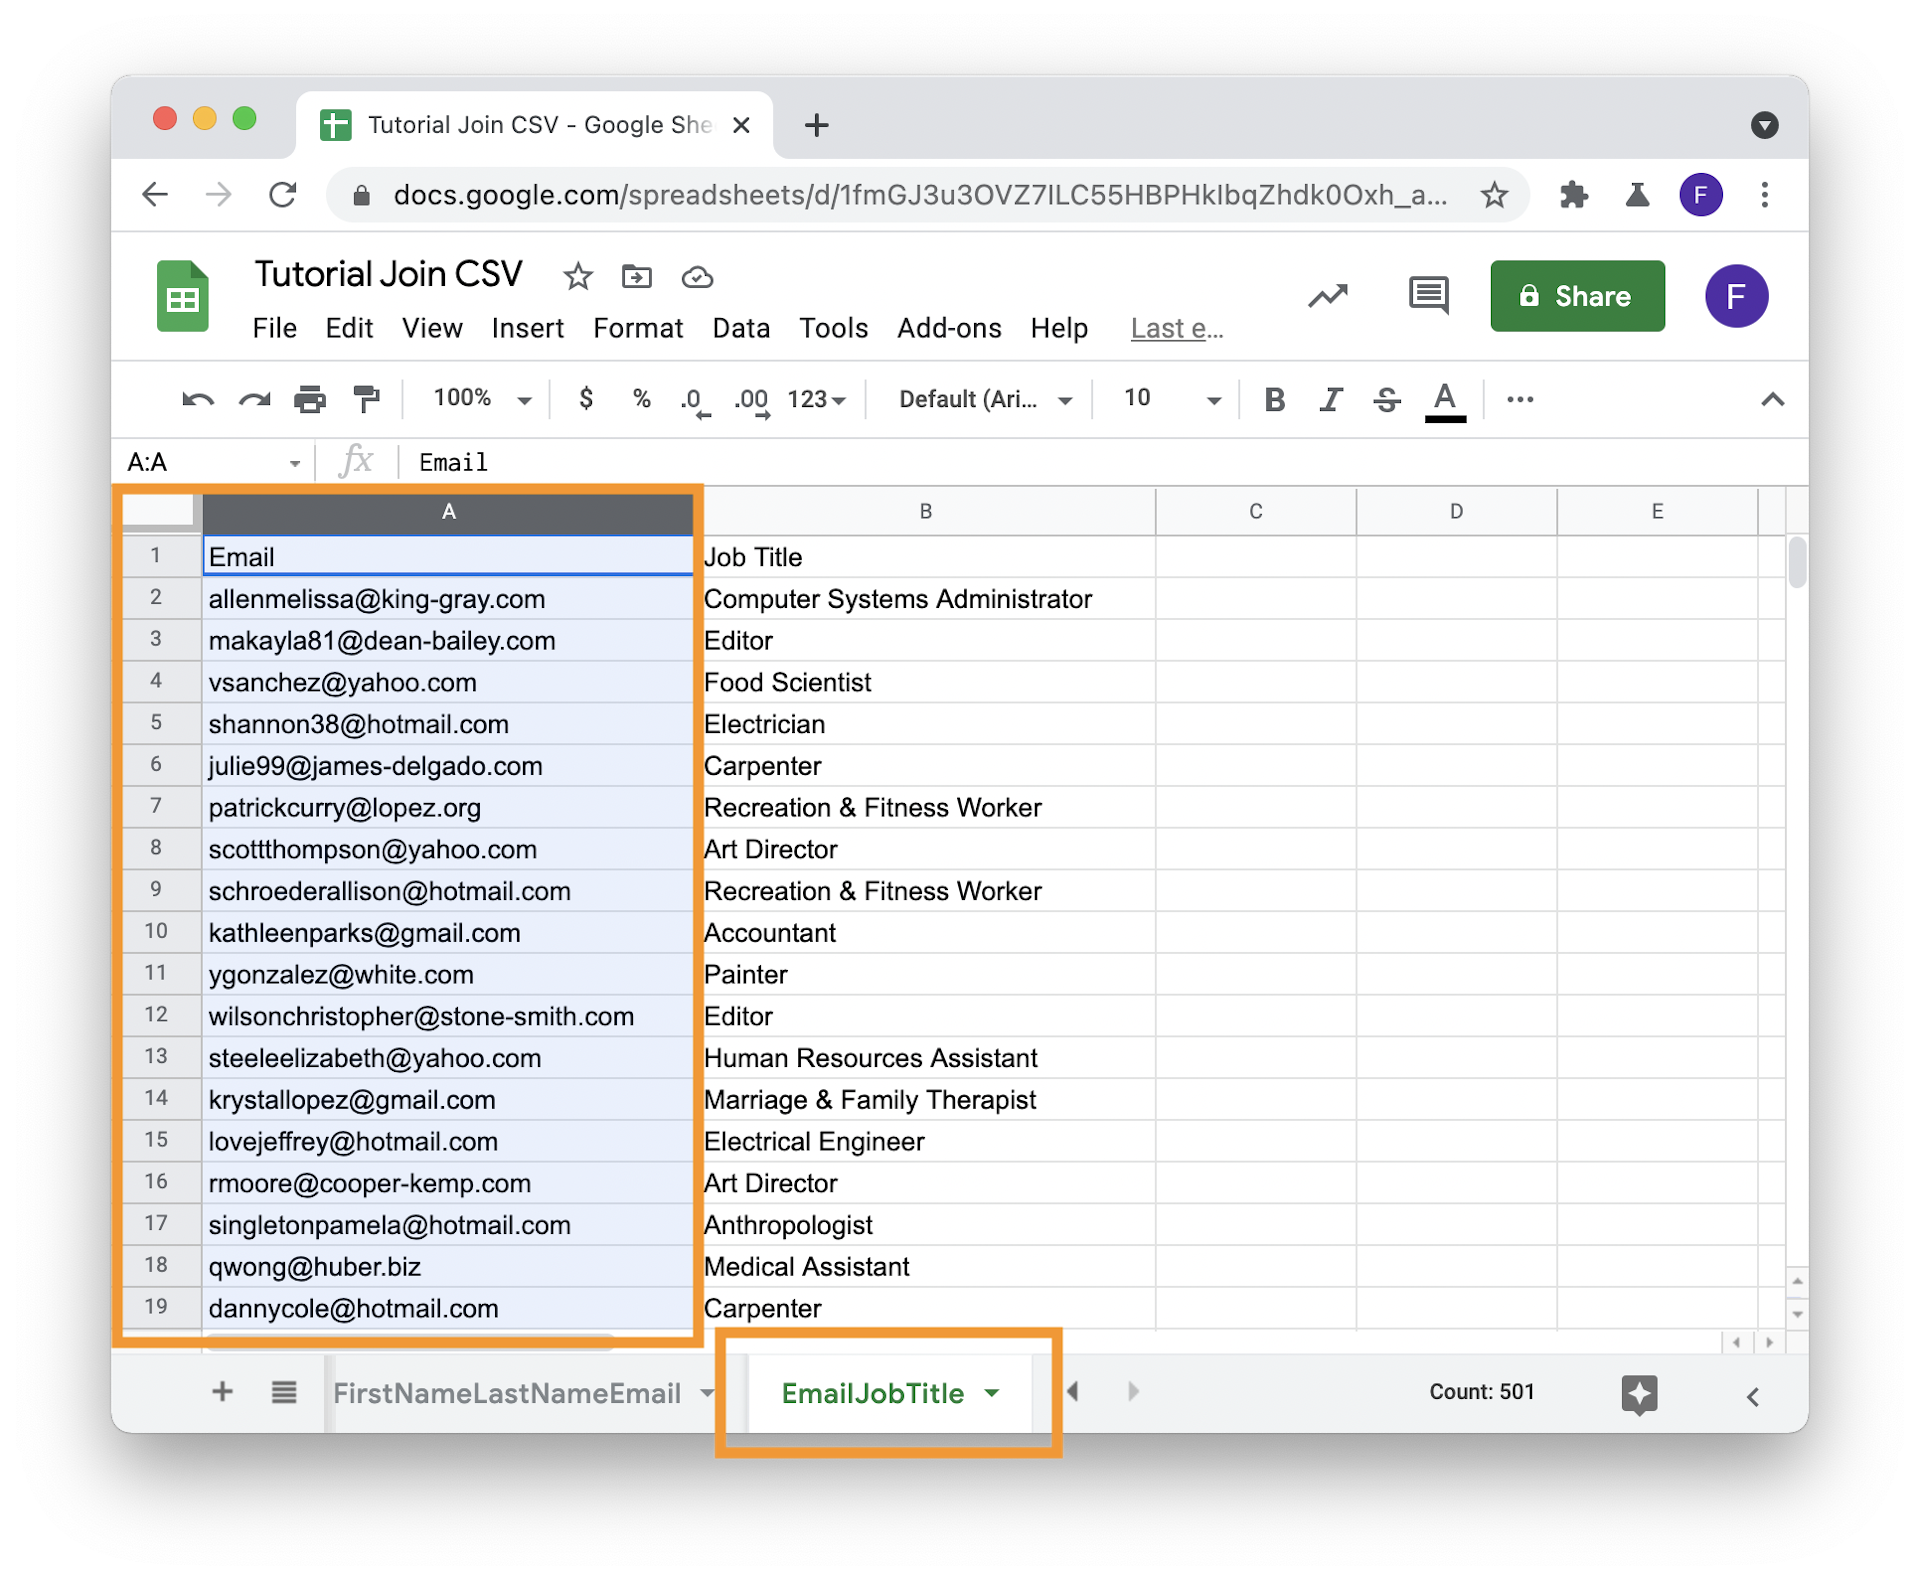
Step 3: Move your unique column as the first column in your secondary tables
The VLOOKUP formula works by searching the first column in the table it searches in. In all your secondary tables, (no need to do it on the master table), move the column to use as join column in the first position.
Step 3: Use the VLOOKUP formula
The final step is to use the VLOOKUP formula to find rows in the other tables and to display a column from the matched row.
The formula takes 3 arguments:
- search_key - The value to search for. It will be the unique identifier row's value.;
- range - The range to consider for the search. The first column in the range is searched for the key specified in search_key. Define your whole secondary table as the range (see video).
- index - The column index in the row to be returned. The first column in the range is numbered 1.
- is_sorted - [TRUE by default] - Indicates whether the column to be searched (the first column of the specified range) is sorted. FALSE is recommended in most cases. If set to True and your data is not sorted, your results will be wrong!
VLOOKUP(search_key, range, index, [is_sorted])
See the video below to understand how to use VLOOKUP to join data on a unique column:
Read more about the VLOOKUP formula on the Google Sheets documentation.
Repeat the operation for every other column from your secondary tables 💪.